Tag: booking

  • One Form, Many Products: How to Reuse a CraftForms Form

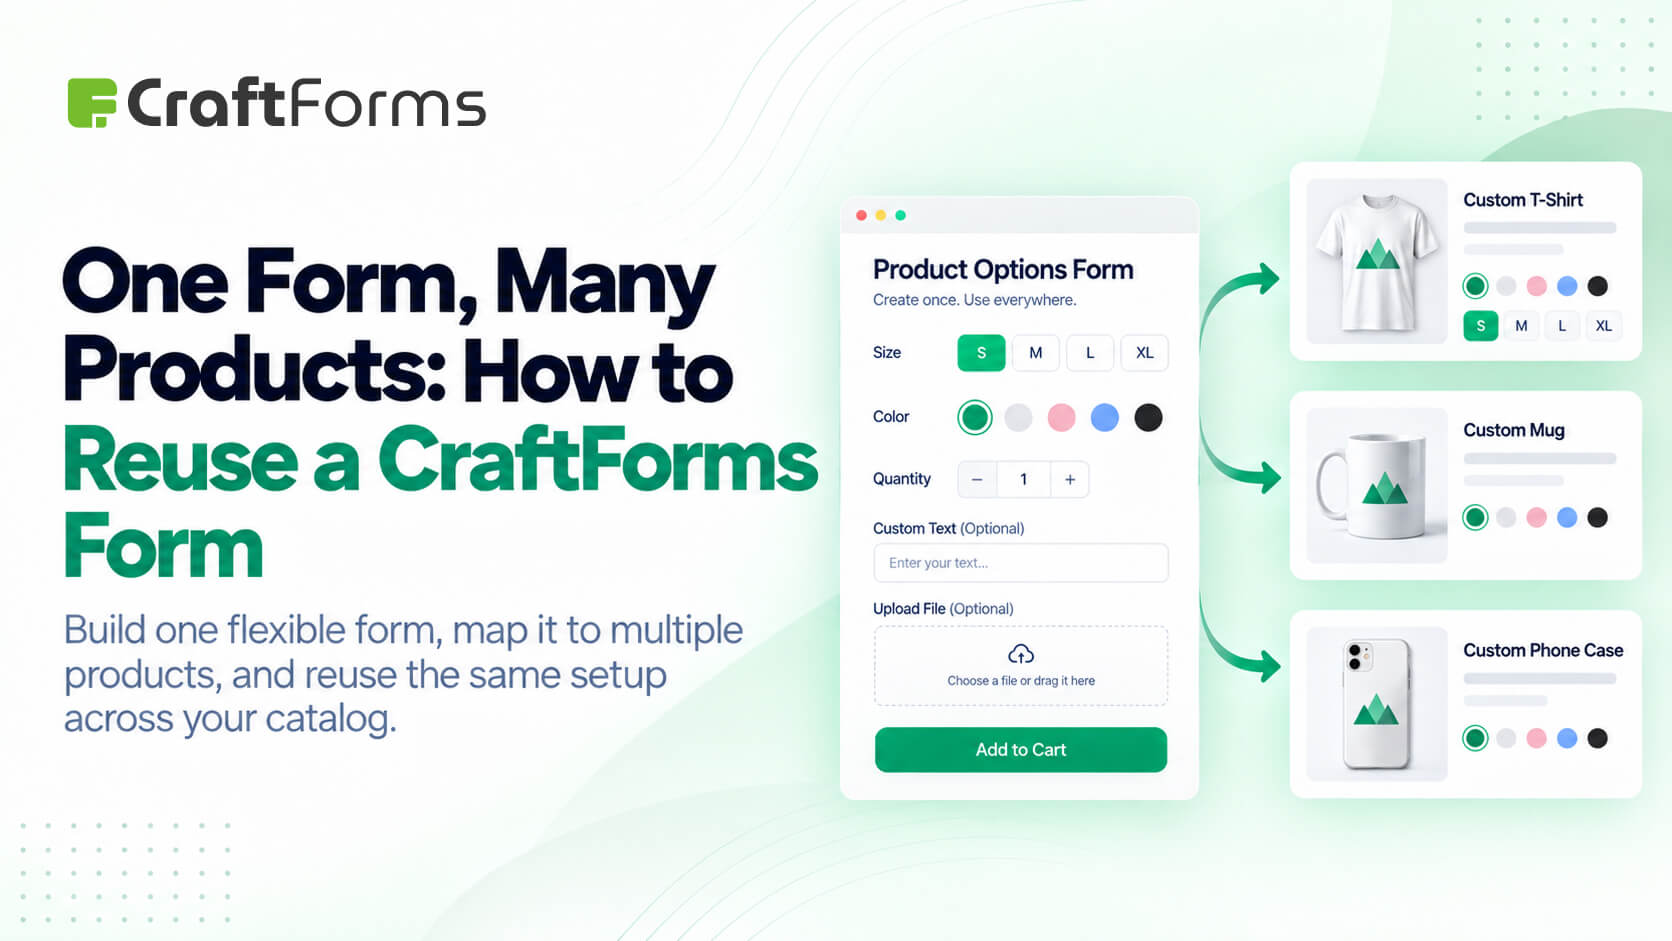
    One Form, Many Products: How to Reuse a CraftForms Form


    TL;DR

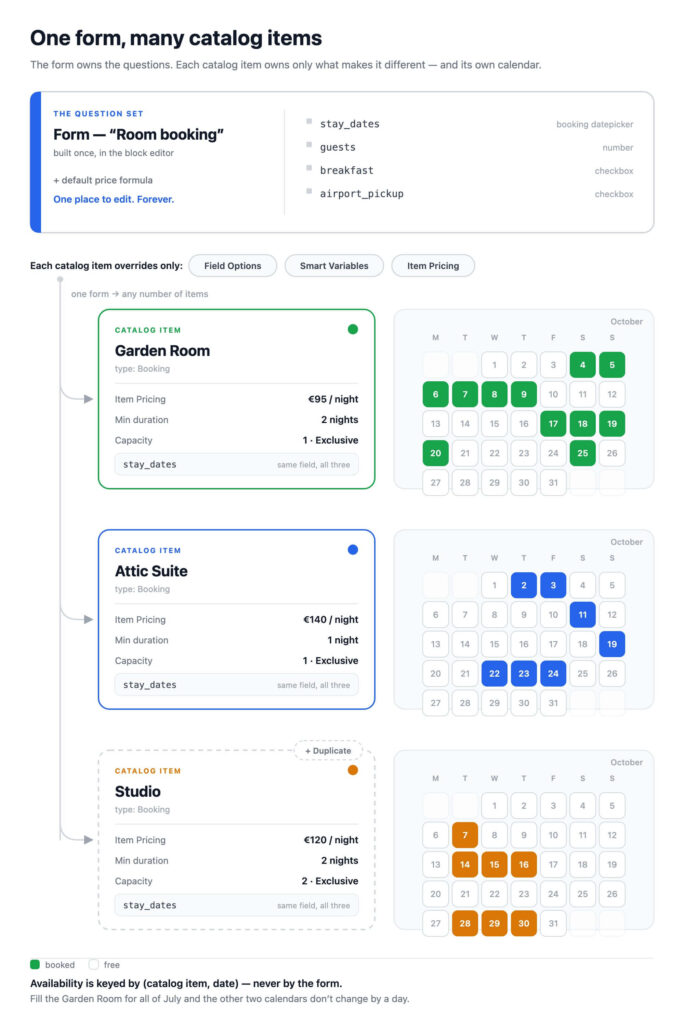
    • The most common CraftForms modelling mistake is assuming one form = one thing you sell. It doesn’t. A form is a question set; a catalog item is the thing being sold. The relationship is one form to many items.
    • A two-room B&B needs one booking form and two booking catalog items. Both rooms ask the same questions (dates, guests, extras) — and because availability is tracked per catalog item, Room 1 selling out has zero effect on Room 2.
    • Same story for products: one “size / colour / quantity” form can back a dozen catalog items that each override the choices, the prices, and the formula — via Field Options, Smart Variables and Item Pricing.
    • Same story for WooCommerce: the form is selected per product, so any number of products can point at one form, each with its own option set, pricing, dynamic SKU and stock table.
    • The non-obvious part is how the link is made. It’s per placement, not per form: insert the form’s synced pattern, then pick Linked Catalog Item in the sidebar (or the block toolbar). Two placements of the same form on one page can link two different items.
    • The trap: the form selector inside a catalog item is labelled “Inspect a form for reference” — it is a schema helper, not a saved binding. A catalog item does not own a form.
    • Catalog is a Pro feature (CraftForms → Catalog).
    Cf one form many catalog items

    If you have built one CraftForms form per product, and you sell fifteen products, you have fourteen forms too many — and fifteen places to make the same edit when you want to add a “Gift wrapping?” checkbox.

    This is the single most useful structural idea in the plugin, and it is easy to miss because nothing forces you into it: a form is not a product. A form is a set of questions and the layout that asks them. What you actually sell — the room, the boat, the banner, the meeting room, the SKU — is a catalog item. One form can serve as the front end for as many catalog items as you like, and each item quietly rewrites the form’s options, variables and pricing when it’s the one being booked or bought.

    CraftForms says this in its own words, in the info panel at the top of every catalog item:

    As the store owner, you create catalog items here and link them to specific pages or form instances on your site. When a linked form is submitted, CraftForms automatically extends it — applying the item’s field options to matching form fields, injecting its variables into calculations, and overriding the form-level pricing. One form, any number of product or booking variations.

    This post is the practical version of that sentence: the model, three setups that come up constantly, and the linkage details that fail silently when you get them wrong.


    The model: question set vs. sellable thing

    Keep these two jobs separate in your head and the rest follows.

    The form owns the questions. Fields, labels, layout, validation, conditional logic, the submit actions (emails, PDFs, orders, webhooks), and a default price formula. Built once, in the block editor, like any other CraftForms form.

    The catalog item owns what makes this one different. Under CraftForms → Catalog each item carries its own:

    • Item Details — Title, Type (Product or Booking), Status (Active / Draft / Archived), calendar colour, description
    • Field Options — per-field choice overrides for select, radio and checkbox fields
    • Smart Variables — extra variables injected into this item’s calculations
    • Item Pricing — a price or formula that applies to this item only
    • Inventory — stock for product items
    • Booking + iCal Import / Export — availability, capacity and calendar sync, for booking items

    Nothing about that list duplicates the form. It is purely the delta between “the questions” and “this particular thing.”


    What a catalog item actually changes at submit

    Three overrides do nearly all the work.

    Field Options override or extend the choices on a select, radio or checkbox field. Each option group targets one field and picks a Strategy:

    • Override — the form’s original choices are discarded and replaced entirely.
    • Merge — choices with the same value are updated; new choices are appended.

    Each group also sets an Option Style (Default, Cards, Color, Image), and every value can carry its own Price, Annotation, Default flag, Description, Color and Image. There’s a Pre-fill choices helper to seed values either from the form field’s own choices or from a WooCommerce attribute.

    Smart Variables defined on the item are injected into the calculation alongside the form’s own.

    Item Pricing is the blunt instrument, and the panel describes itself precisely:

    Define a price or formula that applies to this catalog item only. When set, it overrides the form-level pricing for this item — a local override that leaves the form’s own formula untouched.

    That last clause is the point of the whole feature. The item’s price is a local override. The shared form keeps its own formula, so the other twelve items are unaffected.

    Field names are matched exactly, and a mismatch is silent. Option groups target a field by name; CraftForms warns, in the editor, “Enter the exact field name — non-matching names are silently skipped.” Rename a form field later and every catalog item referencing the old name stops overriding it — with no error, no notice, just the form’s original choices quietly showing through. Grep your catalog items after any field rename.

    Craftforms catalog item override options

    Case 1 — a two-room B&B: one form, two bookings that never collide

    This is the example that makes the model click, because the instinct is so strongly wrong. Two rooms feel like two booking systems. They aren’t. They’re two catalog items.

    Both rooms ask identical questions: check-in and check-out, how many guests, breakfast, airport pickup. So build one form — say “Room booking” — with a booking datepicker field named stay_dates, a guest-count number field, and your extras.

    Then, under CraftForms → Catalog, create two items of type Booking:

    Garden RoomAttic Suite
    Booking TypeDates Range (Hotel / B&B)Dates Range (Hotel / B&B)
    Occupancy ModelExclusiveExclusive
    Capacity11
    Min Duration (nights)21
    Date Field Variablestay_datesstay_dates
    Item Pricing€95/night€140/night

    Two things here surprise people.

    Both items use the same Date Field Variable — and that’s correct. stay_dates is the form’s datepicker field name, and both items track that same field. Its help text explains why the setting exists at all: “Name of the form datepicker field this catalog item should track for date/time availability. When a form has multiple datepickers, this tells the catalog item which one to use.” It disambiguates fields, not items. It is not an identity, so there is nothing to keep unique.

    The two rooms book completely independently. This isn’t a convention you have to maintain — it’s structural. Every availability ledger CraftForms keeps is keyed by the catalog item:

    • day-based bookings are unique per (resource_id, date)
    • slot bookings are unique per (resource_id, date, time_slot)
    • continuous-duration bookings are indexed per (resource_id, date) and overlap-checked within the item

    And the orders table stores the catalog item and the form as two separate columns. Fill the Garden Room for all of July and the Attic Suite’s calendar doesn’t change by a single day, because nothing in that chain is keyed by the form.

    You also get per-item iCal Import / Export, which matters more than it sounds: each room gets its own export feed and its own import URL. That’s exactly what you need to keep the Garden Room in sync with its Airbnb listing while the Attic Suite syncs with its own — one shared form, two independent calendars. (See the Google Calendar sync post for the feed mechanics.)

    Adding a third room is then: open the Garden Room, hit Duplicate, change the title, price and capacity. The form is never touched.

    Keep the booking type consistent across items that share one form. The form has one datepicker field with one shape. Two items that share it should use the same Booking Type — two “Dates Range” rooms, or two “Single Date With Time Slots” services. Mixing a day-range item and a time-slot item on a single shared datepicker field is not a tested path; give that second shape its own form.


    Case 2 — the same product in different sizes, colours and prices

    Now the product side. You sell wall banners. The questions never change: size, material, finish, quantity, artwork upload. What changes per product line is which options exist and what they cost.

    One form — “Banner configurator” — with size, material, finish, qty and a file upload. Then one catalog item per product line, each with Field Options that reshape the choices:

    • Indoor Banner — an Override group on material offering only Paper and Fabric, each with its own per-value price; finish overridden to Matte / Satin.
    • Outdoor Bannermaterial overridden to Vinyl and Mesh at higher per-value prices; a Merge group on finish that appends UV-laminated to the existing choices instead of replacing them.
    • Premium Banner — same choices as Outdoor, but an Item Pricing formula that applies a different rate, plus an extra Smart Variable for a rush-production surcharge.

    Use Override when the item’s list is authoritative and the form’s defaults are irrelevant. Use Merge when the form holds the master list and the item only adjusts a price or adds one extra choice — that keeps a global change (a new finish for everything) a one-place edit on the form.

    Set Option Style to Color or Image on the colour field and each item can ship its own swatches, so the same form renders a genuinely different-looking configurator per product line.


    Case 3 — many WooCommerce products, one form

    WooCommerce works the same way, and the connection lives on the product rather than in the Catalog screen. On a product’s CraftForms panel you get a toggle — “Connect a CraftForms form to this product” — and then a CraftForms Form selector, described as “The CraftForms form that replaces the default add-to-cart button on this product page.”

    Because that selection is per product, there is nothing stopping thirty products from selecting the same form. Each product then keeps its own:

    • Field Options — this product’s colours and sizes
    • Smart Variables and Item Pricing — this product’s rates
    • Inventory, plus a Dynamic SKU Expression and Custom Stock Management stock table — so stock is tracked per resolved option combination, per product

    That’s the WooCommerce payoff of the whole idea: one configurator form, thirty products, thirty independent price sheets and stock tables, and no variation matrix. (See the inventory-by-option and formula-pricing posts for those two panels in depth.)

    You can also render a product’s add-to-cart form anywhere with . The product must be simple, CraftForms-enabled and connected to that same form; otherwise the form still renders, just without add-to-cart, and logged-in editors get an HTML comment explaining why.


    How the link is actually made

    Here’s the part that isn’t obvious, and where most “my catalog item isn’t doing anything” confusion comes from. The link is per placement of the form, not a property of the form. There are three ways to make it.

    1. Per placement in the editor (the default)

    Insert the form on the page as its synced pattern — CraftForms auto-creates one per form, titled “CraftForms: , and it appears in the editor’s Patterns tab. Select that pattern block and you get two equivalent controls:

    • a document sidebar panel, CraftForms Catalog, with a Linked Catalog Item dropdown (“Select a catalog item to extend this form with its pricing, options, and smart variables”)
    • a Catalog Item button right in the block toolbar, showing the currently linked item’s name so you can see and change it without opening the sidebar
    Craftforms catalog item booking appointment form connect synced pattern

    So: /rooms/garden-room gets the Room booking pattern linked to Garden Room; /rooms/attic-suite gets the same pattern linked to Attic Suite. One form, two pages, two items.

    The link is stored per placement, keyed by a stable per-placement ID written into the block comment — which means it survives reordering, and it means two placements of the same form on one page can link to two different catalog items. A single “Our rooms” page can list both rooms, each with its own working booking form. That’s the capability that makes the one-form model scale past one-item-per-page.

    This panel only appears for the synced-pattern placement. The per-placement link is read off the pattern wrapper, so a raw craftforms/form block dropped straight onto a page has nowhere to hang it — no sidebar panel, no toolbar button. Insert the pattern, don’t paste the form’s block markup into the page. (Pasting a copy also forks the form: later edits to the real form won’t reach it.) If you must use a bare block, fall back to the page-meta or shortcode routes below.

    2. The shortcode

    For classic templates, page builders and anywhere blocks aren’t practical:

    [craftforms form="42" catalog-item="7"]
    

    Note the hyphen — the attribute is catalog-item, not catalog_item, and form takes the form’s post ID. For the static/headless embed the equivalent is:

    [craftforms_static_form key="…" resource-id="7"]

    which also accepts catalog-item as an alias.


    The trap: “Inspect a form for reference” is not a binding
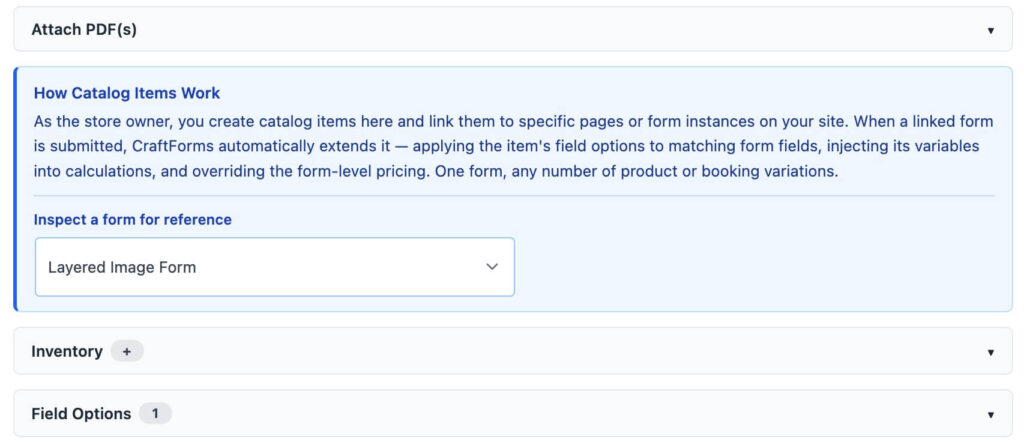
    Craftforms catalog item form by reference

    Open a catalog item and there’s a form dropdown near the top. It is labelled “Inspect a form for reference” — and that label is doing real work. Selecting a form there loads its schema so the editor can show you the field names, datepicker sub-variables and smart variables available for copy-paste while you write formulas and option groups.

    It is not a saved link. A catalog item does not own a form, and nothing at render time reads that selection. If you pick a form there and expect the item to start applying itself, nothing will happen. The binding is always one of the three mechanisms above.

    This is the right design for the one-to-many model — an item that owned a form couldn’t be reused across placements — but the dropdown’s position at the top of the panel makes it look like step one of a wizard. It isn’t.


    Already built one of these? Add items, not forms

    Every tutorial on this blog builds a single sellable thing, because one thing is the clearest way to teach a form. That’s a teaching choice, not a limit — and each of those builds scales the same way: keep the form exactly as it is, and add catalog items.

    • Salon, spa or massage appointments — that walkthrough sets up one service on one schedule. A real salon has several. Add a catalog item per treatment room, per stylist, or per service, all pointing at the same “Book an appointment” form: each item carries its own slot interval, buffer, notice period, capacity and price, and two of them can never be booked into the same slot. One form for the whole salon, however many chairs you add.
    • B&B and vacation rental bookings — builds one rental. Add one booking item per room, exactly as in Case 1 above: its own nightly rate, its own minimum stay, its own iCal feed.
    • Seasonal boat rental — one boat becomes a fleet. Duplicate the item per hull and adjust capacity and the month-keyed price table; the seasonal datepicker is built once and shared.
    • Online order form for a small business — one product becomes one catalog item per product line, each with its own Field Options and Item Pricing.
    • Inventory by option and pricing without variations — both panels are per product, so an entire WooCommerce catalog can share one configurator form while keeping separate stock tables and price rules.

    The rule of thumb: if the questions are the same, you need another catalog item, not another form.


    When you should build a second form

    Reuse isn’t free, and the honest boundary is about questions, not things:

    • Different questions → different form. A room booking and a bike rental don’t share a question set. Forcing both through one form with conditional logic is worse than two forms. Second thought: maybe if it is a one question (form field) that differs and you need just 2-3 products based on this form – try one form and conditional logic. Yet, always better to avoid this scenario. Make forms scalable from day one!
    • Different booking shape → different form. Per the note above, keep one datepicker shape per form.
    • Different submit actions → probably a different form. Submit actions live on the form. If one product needs a PDF contract and a CRM webhook while the other needs a simple confirmation email, that’s a form-level difference. (PDFs are the exception — catalog items have their own Attach PDF(s) panel.)
    • Same questions, different options/prices/availability → one form, many catalog items. This is the case the feature exists for, and it covers far more situations than people expect.

    The shape of it

    One form per question set, one catalog item per thing you sell, and the link made per placement.

    A two-room B&B: one form, two items, two pages — or one page with two placements. Fifteen banner products: one configurator, fifteen items. Thirty WooCommerce products: one form selected thirty times, each with its own prices and stock. When you add a field, you add it once.


  • How to Build a Seasonal Boat Rental Booking Form

    How to Build a Seasonal Boat Rental Booking Form


    TL;DR

    • Boat rental doesn’t fit a plain date-and-price form: the price shifts by season (July costs more than April) and the boat is only available in half-day time slots, not “all day.”
    • CraftForms’ booking datepicker has a seasonal mode built for exactly this — you define date ranges (“seasons”), and each season gets its own weekly schedule of time slots. Peak season can offer more, shorter slots; shoulder season fewer, longer ones.
    • An expression Smart Variable (mnth = month(booking.date)) reads the month straight out of whatever date the customer picks, and feeds a Table Smart Variable that returns that month’s price — no separate forms, no manual date-range pricing rules.
    • The Boat Rental (Seasonal) starter ships this pattern ready-built: per-boat pricing, capacity-capped quantity. It’s a Pro starter.
    • A Catalog resource attached to the form tracks per-date/per-slot availability automatically, so a confirmed booking blocks that slot — no manual availability spreadsheet. Getting the cap to actually enforce per-boat (not just per-booking) takes one extra setting, covered below.
    • This form’s companion — a shared, skippered trip priced per person instead of per boat — gets its own walkthrough in a separate post, since the pricing and capacity mechanics there are different enough to deserve their own space.

    Boat rental is a good stress test for a booking form, because it breaks two assumptions most generic date-picker plugins make. First, the price isn’t fixed — a half-day out on the water in July isn’t priced the same as one in April, because demand (and often fuel, staffing, and insurance costs) swings by season. Second, availability isn’t “free or booked for the day” — a boat goes out in half-day slots, and how many slots exist on a given day depends on the season too: peak summer might run three tighter slots, shoulder months just two longer ones.

    A contact form can’t calculate a month-aware price. A generic date picker can’t offer three time slots in August and two in April on the same calendar. CraftForms handles both with two features working together: seasonal booking mode and a month-keyed price table. Rather than explain that abstractly, this post walks through the actual starter form that ships with the plugin — Boat Rental (Seasonal) — field by field, formula by formula.

    Cf boat rent august
    Cf boat rent september

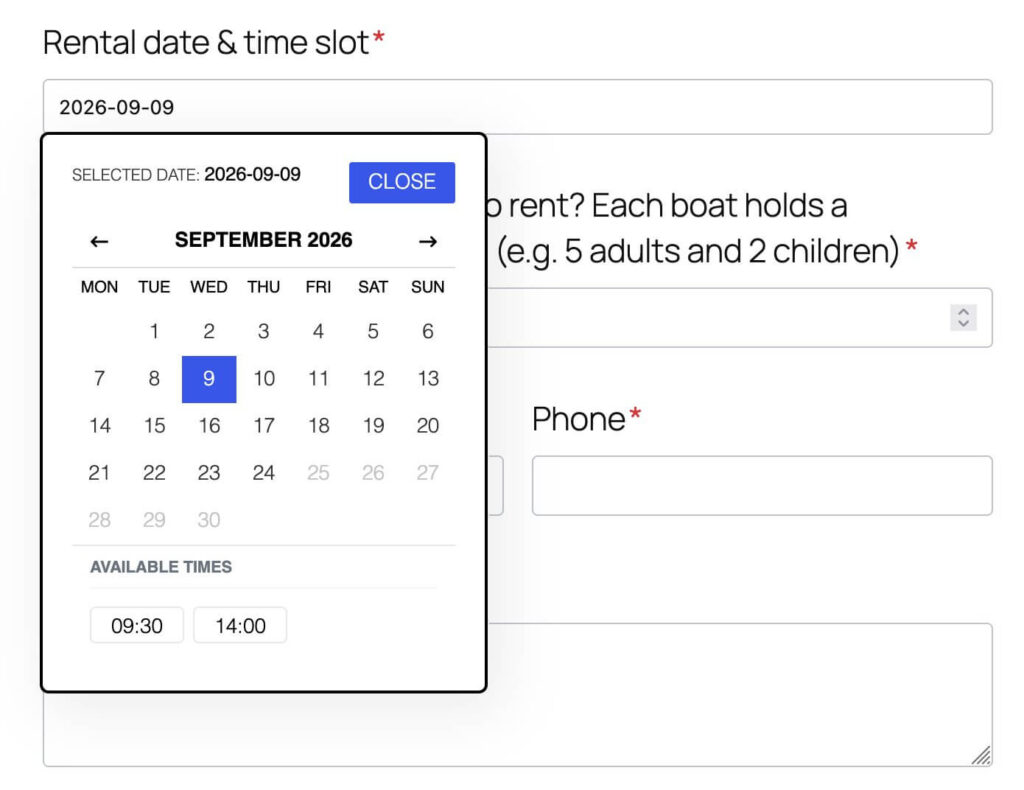
    Same field, same calendar widget — the number of bookable times per day changes depending on which season the selected date falls into. That’s the whole point of seasonal mode.


    Why This Doesn’t Fit a Plain Booking Form

    Before opening the starter, it’s worth being specific about what a “simple” booking form gets wrong here:

    • One price for the whole season. If you hardcode a single day-rate, you either underprice July or overprice April. Neither is sustainable for a seasonal business.
    • One time-slot schedule for the whole year. If your quietest month and your busiest month share the same slot times, you’re either wasting capacity in August or offering slots nobody wants in April.
    • No capacity ceiling. A rental fleet has a finite number of boats (or one boat, in this starter’s case) available per slot. Without a hard cap tied to that inventory, the form will happily accept a booking you can’t fulfil.

    The starter solves all three with two building blocks: the datepicker’s seasonal mode, and a Table Smart Variable keyed by month. Let’s open it.


    Walkthrough — Boat Rental (Seasonal)

    This is the self-drive starter: a customer rents one or more boats for a half-day slot and drives themselves. Here’s what’s actually in the form.

    The seasonal datepicker

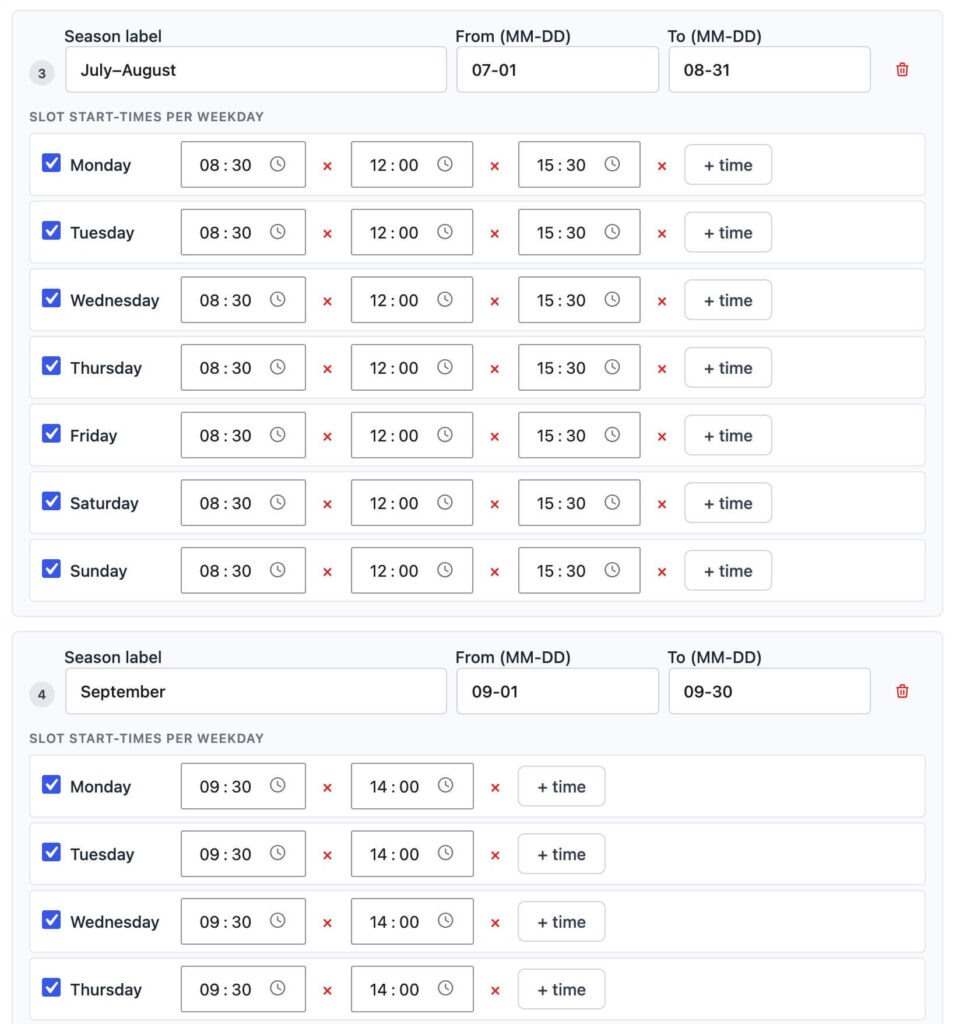
    The Rental date & time slot field (booking) is a booking-datepicker-field set to Field Type: "seasonal". Instead of one weekly schedule for the whole year, it defines five seasons, each with its own date range and its own weekly time-slot schedule:

    SeasonDate rangeTime slots (every day)
    April–May04-01 to 05-3110:00, 14:00
    June06-01 to 06-3009:30, 14:00
    July–August07-01 to 08-3108:30, 12:00, 15:30
    September09-01 to 09-3009:30, 14:00
    October10-01 to 10-3110:00, 14:00

    Notice the shape: shoulder months (April–May, September, October) get two half-day slots a day, June gets its slots nudged half an hour earlier, and peak season (July–August) gets a third slot squeezed in at 08:30/12:00/15:30. That’s the whole point of seasonal mode — the schedule itself changes by date range, not just the price. Each season is defined once, with a start/end date and a per-day-of-week list of enabled times, and the picker only shows the times valid for whichever season the selected date falls in.

    If you need to restrict how last-minute someone can book, or how far out they’re allowed to book at all, the datepicker’s advance-notice and bookable-date-window settings apply on top of seasonal mode the same way they do on every other booking mode — they’re not something you rebuild per season.

    The field alone doesn’t check availability or capacity. The seasons you just defined on the datepicker field make it look right — the correct months, the correct times per season — but on their own they’re purely a schedule display. Without a connected Catalog resource, the picker never asks the backend whether a date/time is already booked, so every slot always shows as available, and the quantity cap in the next section has nothing real to bind to. This is a simplified/demo-friendly booking mode, not a capacity-enforcing one — CraftForms shows this same warning directly in the field’s Seasonal Time Slots panel. Real availability and capacity checking is a Catalog-resource feature, covered next.

    Setting it up on a Catalog resource

    The seasons table above lives on the form’s datepicker field by default, and the field works on its own for a purely cosmetic seasonal calendar. But for the quantity cap (next section) to mean anything, you need real inventory behind it — a Catalog resource, a separate “boat” or “fleet” entry that tracks how many units are actually available per slot. Under CraftForms → Catalog, create a booking-type item and set:

    Cf booking
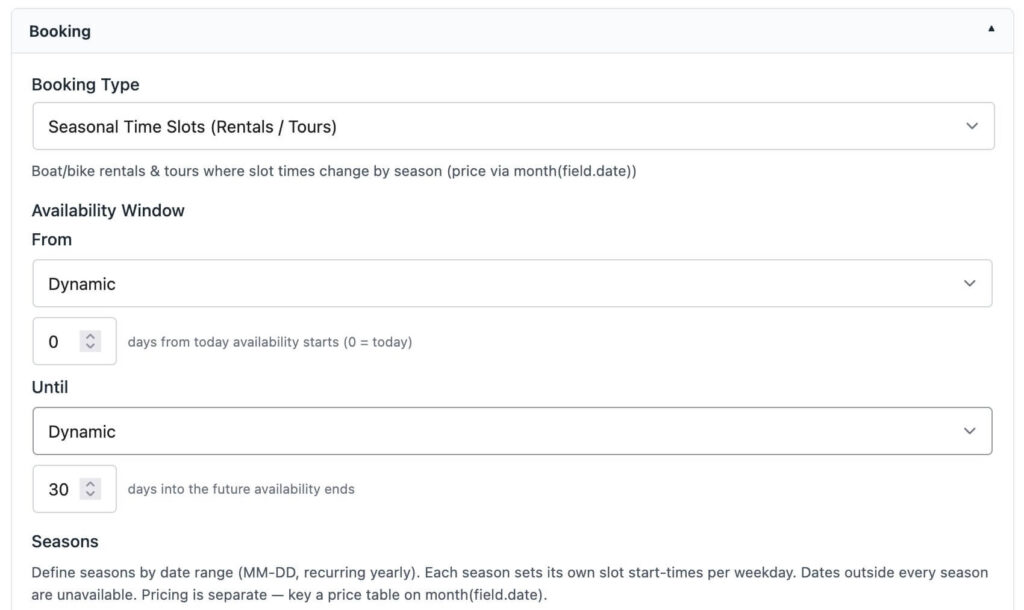
    • Booking Type: Seasonal Time Slots (Rentals / Tours)
    • Availability Window: how far out customers can book (the starter’s default of 0–30 days is a sane starting point; widen it for a business that takes bookings further ahead)

    Then, under Seasons, define the same five date ranges and per-weekday time slots as the table above. Once this resource is connected to the form, its seasons are the ones that actually drive the calendar — the datepicker field’s own seasons data is ignored entirely in favor of the resource’s, so there’s no need to keep two copies in sync. Define seasons once, here, on the Catalog item:

    Cf booking

    Now, after we set availability days and times inside the catalog item – we can remove this data from datepicker form field itself. There is no need to keep duplicates. Besides, the data from the form field will not be used for the form connected to this catalog item. Attention: the datepicker form field must be referenced inside the catalog item too (for this data to be used). We will do it soon. Keep reading.

    The quantity field, capped by capacity

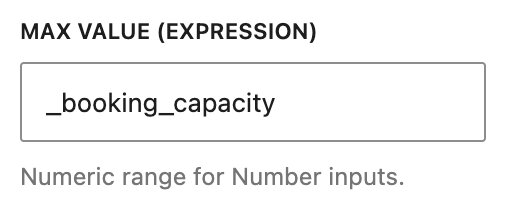
    Right under the datepicker sits a number field named qty — “How many boats do you want to rent?” It carries a Max Value (expression) of _booking_capacity, set in the field’s Dynamic Validation panel (the panel that lets a field’s validation react to live data instead of a fixed number).

    Cf dynamic validation

    That expression binds the field’s maximum to whatever capacity the connected Catalog resource reports for the selected slot. The customer physically cannot request more boats in a slot than the resource says are available — CraftForms enforces it as a live max on the field, not a manual note in the label.

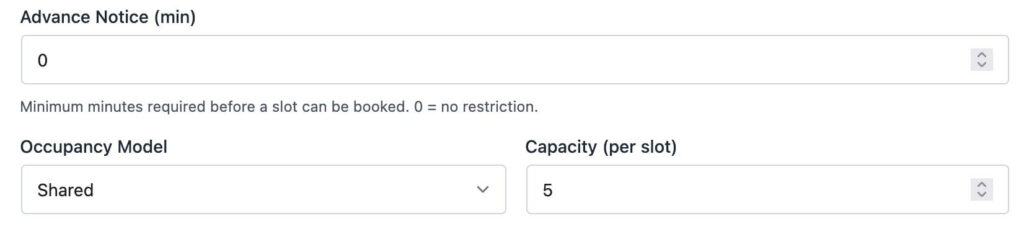
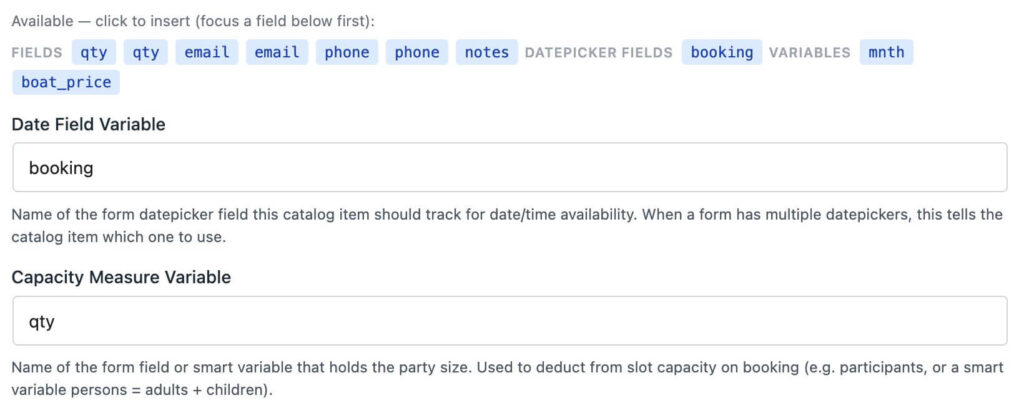
    Getting that cap to actually count boats correctly takes one more setting on the Catalog resource, and it’s the part that’s easy to miss: by default a resource’s Occupancy Model is “Exclusive,” meaning the whole slot is marked taken by a single booking regardless of how many boats that booking asked for — so five separate customers could each book qty=5 in the same slot before anything blocks them. You want Shared occupancy instead, plus a Capacity Measure Variable that names the field holding the quantity to deduct:

    Cf booking
    Cf booking

    With Occupancy Model: Shared and Capacity Measure Variable: qty, a booking of qty=3 correctly deducts 3 boats from that slot’s capacity of 5 — leaving 2 for the next customer — instead of just marking the slot “used” after the first booking. This is also where the Catalog resource earns its keep beyond pricing: once a booking is confirmed, CraftForms marks that date/slot’s remaining capacity accordingly, so the next visitor sees accurate availability automatically. No separate spreadsheet, no manually blocking out dates after every phone booking.

    Pricing by month: the mnth variable and the price table

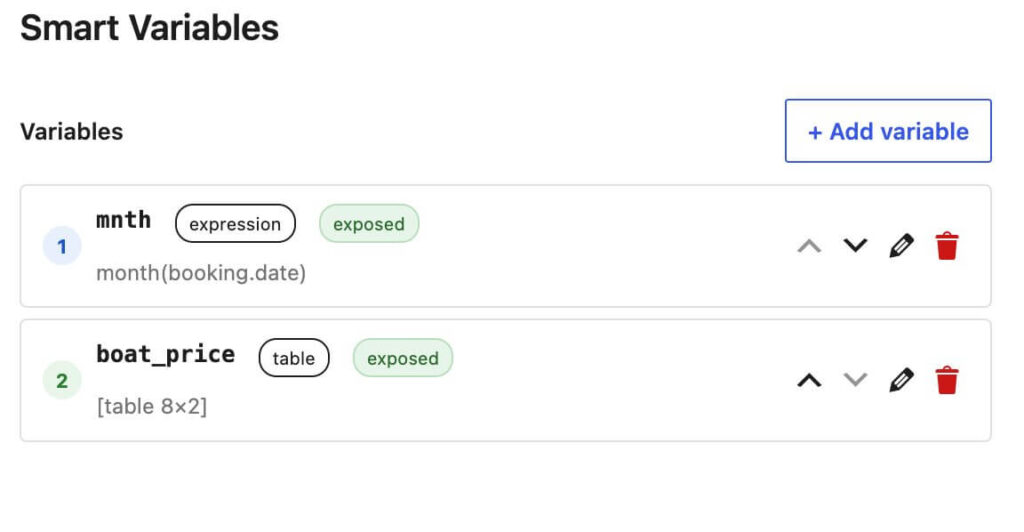
    Here’s the part that makes the whole thing tick. Open Smart Variables on this form and there are two entries doing the pricing work:

    Cf smart variables list

    mnth — an expression variable:

    Cf smart variable
    month(booking.date)
    

    booking is the name of the datepicker field, and .date pulls the date portion out of whatever the customer picked. The month() function returns just the numeric month (4 for April, 7 for July, and so on). This one line is what lets the rest of the form price “by season” without ever touching a season’s name — it just needs the month number.

    boat_price — a table variable keyed on mnth, using the exact match lookup strategy:

    Cf smart variable
    MonthPrice
    4€130
    5€130
    6€145
    7€160
    8€160
    9€145
    10€120

    The table’s row and column variable are both set to mnth, and the lookup strategy is exact match — the resolved month has to match a row precisely, which is correct here since every month in the operating season has its own explicit price. (Contrast this with a “closest” strategy, which you’d use for tiered pricing where in-between values should round to the nearest defined tier — not needed here since every month is already listed.)

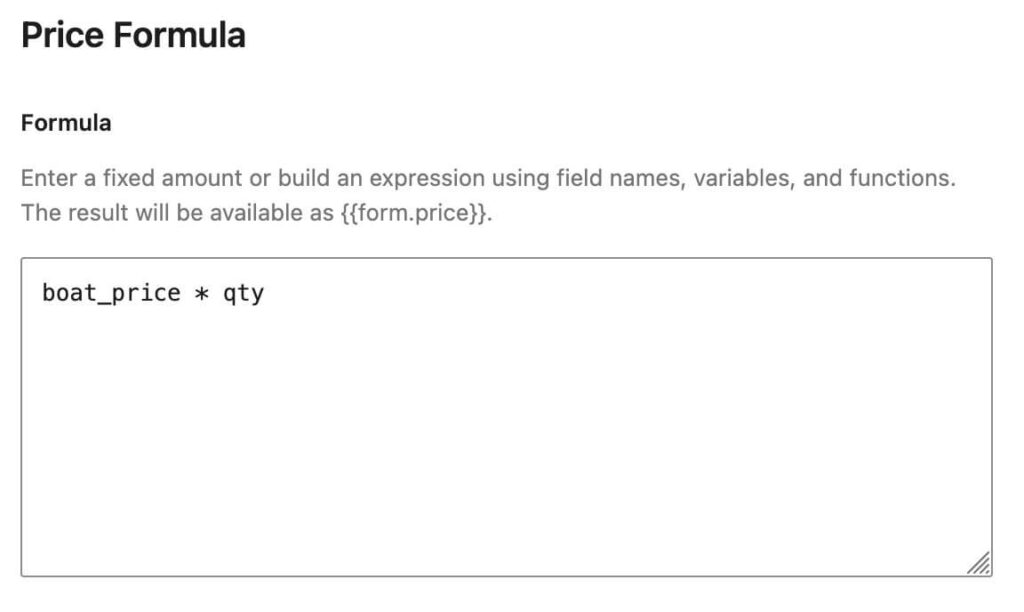
    The form’s Price Formula ties it together in one line:

    Cf price formula
    boat_price * qty
    

    Pick a date in August, mnth resolves to 8, boat_price looks up €160, multiply by however many boats the customer requested, and that’s the total — recalculated the instant the date or quantity changes, and re-verified on the server at submission so nothing the customer could tamper with in the browser makes it to checkout.

    The total shows live in an Info block near the bottom of the form:

    Total: €{{form.price}}
    

    next to a plain-language note — “Half-day rental (4 hours) · price per boat varies by season” — so nobody is surprised the number changes when they pick a different month.


    Taking Payment and Sending a Confirmation

    This starter uses the same payment and confirmation pattern covered in our other booking and order-form guides:

    1. Connect Stripe. Go to CraftForms → Payment Settings, enter your Stripe publishable and secret keys (test keys first), set your currency, and add the webhook URL CraftForms gives you to your Stripe dashboard. The webhook is what moves an order from pending to paid once Stripe confirms the charge.
    2. Add the payment block. Drop the CraftForms Payment block into the form, typically just above the submit button. Without it, the form still calculates and displays a price, but it won’t actually charge anyone.
    3. Full payment or a deposit — it’s the same mechanism, just a different formula. CraftForms doesn’t have a separate “deposit” feature; if you want to collect a 30% deposit instead of the full charter price up front, write it into the Price Formula itself, e.g. round(boat_price * qty * 0.3, 2). The rest of the payment flow — Stripe keys, webhook, order status — doesn’t change.
    4. Confirmation email. In the form’s action settings, add an email action addressed to {{email}}, referencing any field with {{field_name}} tags ({{qty}}, {{booking}}, {{form.price}}, etc.). Pick a saved Email Template if you want a branded layout instead of plain text.
    5. Track it in Orders. Every submission shows up in CraftForms → Orders with the customer’s details, the calculated price, the Stripe reference, and its status — pending → confirmed → paid → refunded — so you’re not reconciling bookings against a separate spreadsheet.

    Making It Yours

    This starter is deliberately built around one boat so the pricing logic stays readable, but nothing about the mechanism is fixed to boats specifically:

    • Change the seasons. Add, remove, or resize the date ranges to match your actual operating calendar — a five-season year isn’t a requirement, it’s just what this boat happens to run. Once the datepicker field is connected to a Catalog resource, the resource’s seasons are the ones that actually count — the field’s own Seasonal Time Slots panel still shows a seasons editor, but its values are ignored at render time in favor of the connected resource’s. Edit seasons on the Catalog item, not the field.
    • Change the slot times and density per season. Nothing stops you from running four short slots in peak season and one long slot the rest of the year, or closing certain days of the week entirely (each day in a season’s schedule can be disabled independently).
    • Change the price table’s numbers, or add more rows if your season runs longer than April–October.
    • Change the capacity logic. The Shared occupancy model plus a Capacity Measure Variable is just a Smart Variable/Catalog pattern — point the Capacity Measure Variable at whatever field holds your quantity, and set the resource’s capacity to match your real fleet size.

    To load this starter yourself: when creating a new CraftForms form, the Choose form starter modal opens automatically the first time (it also lives permanently under Starter Templates in the block editor’s document sidebar, in case you dismiss it or come back later). Pick Boat Rental (Seasonal) from the list, and everything above — seasons, price table, and capacity fields — is already sitting there for you to inspect and adjust.


    Summary

    Here’s what this starter demonstrates:

    1. A seasonal booking datepicker mode where each date range gets its own weekly schedule of time slots — denser in peak season, sparser in shoulder months
    2. An expression Smart Variable (month(booking.date)) that reads the month straight out of the picked date
    3. A Table Smart Variable, keyed on that month, that resolves the correct season’s price automatically
    4. Capacity enforcement via a Dynamic Validation Max Value expression bound to _booking_capacity, backed by a Catalog resource set to Shared occupancy with a Capacity Measure Variable pointing at the quantity field — the setting that makes the cap count boats instead of just bookings
    5. The same Stripe payment and confirmation-email pattern used across every other CraftForms booking form, including writing a deposit as a fraction of the formula rather than a separate feature

    Install CraftForms Pro, load the Boat Rental (Seasonal) starter, and you’re looking at a complete seasonal rental booking form — pricing, availability, and capacity all included — ready to point at your own boats, seasons, and prices.

    Running a shared, skippered trip instead of a self-drive rental? The same seasonal mechanism, priced per person with a shared headcount cap, is covered in the companion post on the Boat with Skipper (Seasonal) starter.

  • Sync Your CraftForms Bookings to Google Calendar

    Sync Your CraftForms Bookings to Google Calendar


    TL;DR

    1. CraftForms → Catalog → open your booking item → “iCal Import / Export” → copy the Export feed URL.
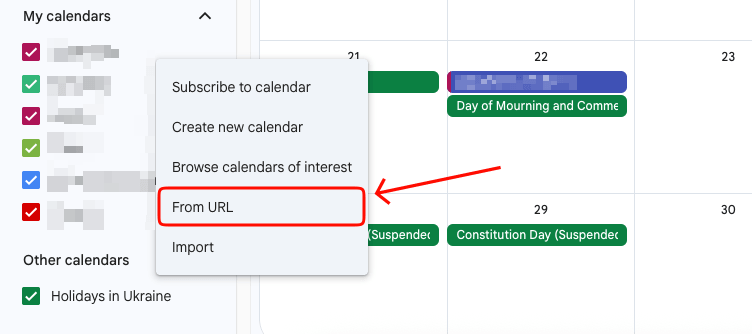
    2. Google Calendar → Other calendars → + → From URL → paste → Add calendar.
    3. Bookings appear as “Booked” blocks (no customer data). Google refreshes on its own schedule — great for planning, not for the second-by-second.
    4. Bonus: paste your Google Calendar’s secret ICS address into CraftForms’ Import field to auto-block your days off.

    Your bookings, in your calendar, on every screen you own — without lifting a finger after setup.


    You take a booking on your website. A few seconds later it’s sitting in your Google Calendar — on your laptop, on your phone, on the shared calendar your whole team watches. No copy-pasting. No “did anyone write that down?” No Zapier subscription, no third-party connector, no spreadsheet in the middle.

    That’s the whole promise of this post, and it’s built into CraftForms. Every booking taken through a CraftForms booking form can be published as a live calendar feed that Google Calendar — or Apple Calendar, or Outlook — subscribes to and keeps up to date on its own.

    If you run a B&B, a salon chair, a tutoring slot, a photography studio, a rental, or anything where “is that day free?” is a question you answer ten times a week, this is the feature that lets you stop answering it from memory.

    Here’s exactly how it works and how to set it up — plus the honest caveats nobody mentions until you’re already frustrated.


    Why bother? (Or: the problem with bookings that live in a database)

    CraftForms already does the hard part well. It stores every booking, prevents double-bookings, and shows availability in the date picker on your site. So why pull bookings out into Google Calendar at all?

    Because your business doesn’t live inside the WordPress admin. You live in your calendar — the one that buzzes your phone in the morning, the one your assistant checks before saying “yes, we can fit you in,” the one you glance at to decide whether you can take Friday off.

    When bookings sit in one place and your life sits in another, you get the two classic failures:

    • You forget. A booking exists, but it’s not in front of you when you’re planning your week.
    • You double-promise. You tell a friend you’re free Saturday because your personal calendar looked empty — but the website took a booking that morning.

    Subscribing Google Calendar to your CraftForms bookings closes both gaps. One source of truth, mirrored everywhere you already look.


    What the feed actually is (in plain terms)

    CraftForms exposes your bookings as an ICS feed — sometimes called an iCal feed. Don’t let the “iCal” name fool you; it has nothing to do with Apple specifically. ICS (.ics) is the universal, decades-old calendar format that every major calendar app understands: Google Calendar, Apple Calendar, Outlook, Thunderbird, all of them.

    A feed is just a special URL. When you give that URL to Google Calendar, Google quietly visits it every so often, reads the list of booked dates, and draws them onto your calendar as events. You never touch it again. New booking comes in? It appears at Google’s next check.

    The URL looks like this:

    https://yoursite.com/wp-json/craftforms/v1/catalog/12/ical/a1b2c3d4e5f6a7b8c9d0e1f2a3b4c5d6
    

    That long random string at the end is a security token — more on that below. The important thing: it’s read-only. Google can look, but it can’t change anything, and nobody who doesn’t have the exact URL can find it.

    Heads up — this is a CraftForms Pro feature. The booking catalog item and its ICS import/export feeds are part of CraftForms Pro. If you’re on the free version you’ll have forms, but not the booking calendar engine behind this article.


    Before you start: you need a booking item set up

    This post assumes you’ve already built a booking — a thing customers can reserve. If you haven’t, do that first; these walkthroughs cover it end to end:

    • B&B / vacation rental (check-in to check-out date ranges)
    • Salon / spa / appointments (fixed time slots on specific days)
    • Booking + automated confirmation email

    In CraftForms terms, a booking lives in the Catalog. Go to CraftForms → Catalog in your WordPress admin (it sits under the CraftForms Forms Management menu), and you’ll either see your booking item there or create a new one with Type: Booking.

    Once you have a booking item that’s actually taking reservations, you’re ready to wire it to Google Calendar.


    Part 1 — The main event: see your bookings in Google Calendar

    This is the outbound direction: CraftForms → Google Calendar. Your bookings flow out to Google.

    Step 1: Grab your export feed URL from CraftForms

    1. Go to CraftForms → Catalog and open your booking item.
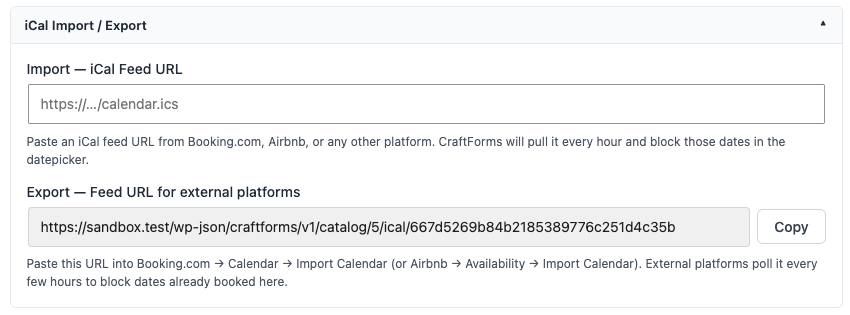
    2. Scroll to the section titled “iCal Import / Export.”
    3. Find the field labelled “Export — Feed URL for external platforms.” It shows a long read-only URL.
    4. Click Copy.

    That URL is your booking calendar. Keep it on your clipboard for the next step.

    If you see “Save this item first to generate the export URL” instead of a URL, just save the booking item once. The feed URL is generated the first time the item is saved, then it stays stable forever (so subscriptions never break).

    Cf ical export import

    Step 2: Add the feed to Google Calendar

    Now hand that URL to Google:

    1. Open Google Calendar on a desktop browser (the subscribe option isn’t available in the mobile app — but once added, it syncs to mobile automatically).
    2. In the left sidebar, find “Other calendars” and click the + next to it.
    3. Choose “From URL.”
    4. Paste your CraftForms export feed URL into the box.
    5. Click “Add calendar.”

    That’s it. Google fetches the feed and adds a new calendar to your list. Your CraftForms bookings now appear as events.

    Cf gcal add new cal

    Google’s menu labels shift from time to time. If “From URL” isn’t where you expect, look under Settings → Add calendar → From URL — same feature, longer path.

    Step 3: See it work

    Within a short while, your booked dates show up on the calendar as all-day “Booked” events sitting alongside everything else you already track.

    A few things to notice about how it looks:

    • Day-based bookings (hotel / B&B style) show as a block spanning the booked nights.
    • Single-date and time-slot bookings (appointments, drop-ins) show as the booked day.
    • The event is simply titled “Booked.” It deliberately contains no customer name, email, or any personal detail — see the privacy note below.

    A genuinely nice side effect: privacy

    The feed only ever says “Booked.” It never publishes who booked, their email, their phone number, or what they ordered.

    That’s by design, and it matters. Because the feed URL has to be publicly reachable for Google to fetch it (Google won’t log into your WordPress admin), you do not want it leaking customer data. CraftForms keeps the customer’s actual details safely in your WordPress database — where you can see them in the submissions and orders — and lets only the bare “this slot is taken” signal out to the calendar.

    So if you ever share that Google calendar with a part-timer or a cleaner, you’re showing them your availability, not your client list.

    The token is your lock. That random string at the end of the URL is the only thing protecting the feed. Treat it like a password: don’t post the full URL publicly. If it ever leaks, duplicating the booking item generates a fresh URL (the old one stops working).


    The honest part: how fresh is it, really?

    Here’s what most tutorials skip. Calendar subscriptions are not instant.

    When Google subscribes to an external ICS feed, Google decides how often to check it — and Google is famously unhurried about this. In practice a subscribed feed refreshes anywhere from a few hours to around a day. You cannot force Google to check more often; that schedule is on their side, not yours.

    What this means in practice:

    • For planning and visibility — perfect. Seeing this week’s and next week’s bookings on your phone? Works beautifully.
    • For minute-by-minute, real-time accuracy — not the tool. If you need a booking to appear in Google within seconds (say, to stop a same-hour double-booking across two systems), an ICS subscription is the wrong mechanism. That’s what a real-time channel manager is for, and it’s overkill for most small operators.

    To nudge along the very first sync, remove and re-add the calendar in Google — a fresh subscription fetches immediately. After that, let Google do its thing.

    Don’t mistake this for CraftForms being slow. Your site’s own booking calendar and date picker update the instant a booking is made — there’s no double-booking risk on your website. The delay is purely Google’s polling of the external feed.


    Part 2 (bonus) — Block your days off automatically

    The feed runs both directions, and the reverse is just as useful.

    Say you keep your personal commitments — holidays, that dentist appointment, the long weekend — in a Google Calendar. You’d like the website to know you’re unavailable on those days and stop offering them to customers. CraftForms can subscribe to your Google Calendar and block those dates in the date picker.

    This is the inbound direction: Google Calendar → CraftForms.

    1. In Google Calendar: open the settings for the calendar you want CraftForms to read. Under “Integrate calendar,” copy the “Secret address in iCal format.” (Use the secret address — it’s the private one only you should hold.)
    2. In CraftForms: open your booking item, go to the same “iCal Import / Export” section, and paste that address into the “Import — iCal Feed URL” field.
    3. Save.

    From now on, CraftForms pulls that Google Calendar every hour and marks any busy dates as unavailable in your booking date picker. Block out next week in Google, and customers can no longer book you for next week — no manual blocking required.

    Want to verify it immediately instead of waiting for the hourly sync? If you have command-line access, run wp cron event run craftforms_ical_sync to force a pull right away.

    You can point the Import field at any ICS feed — a partner’s calendar, a shared “shop closed” calendar, even another booking platform. CraftForms treats every busy date in that feed as a date to block.


    Putting it together: one calendar, every device

    With both directions wired up, you’ve built a tidy little loop:

    • Customers book on your site → those bookings flow out to your Google Calendar, so you (and your team) see them everywhere.
    • You block personal time in Google → those dates flow in to CraftForms, so customers can’t book over your life.

    All of it through one open, universal format, with no monthly connector fee and no customer data leaving your server.


    When an ICS feed isn’t the answer

    To be fair about the limits:

    • You need real-time, two-way sync across multiple sales channels. If you’re selling the same rooms on Airbnb, Booking.com, and your site simultaneously and a delay of even an hour risks a double-booking, you want a dedicated channel manager (Hostaway, Guesty, Lodgify) that uses each platform’s live API. ICS feeds, by their nature, poll on a schedule.
    • You want to edit bookings from Google. The export feed is read-only. Dragging the “Booked” event in Google won’t move the actual reservation in CraftForms — manage bookings from the CraftForms admin.

    For the overwhelming majority of small operators, though — the ones who just want their bookings to show up where they already look — the ICS feed is exactly enough, and it’s already in the box.


    CraftForms is a WordPress form and booking builder. The booking catalog and iCal import/export feeds described here are part of CraftForms Pro.

  • Build a B&B Booking Form with Availability and Orders

    Build a B&B Booking Form with Availability and Orders

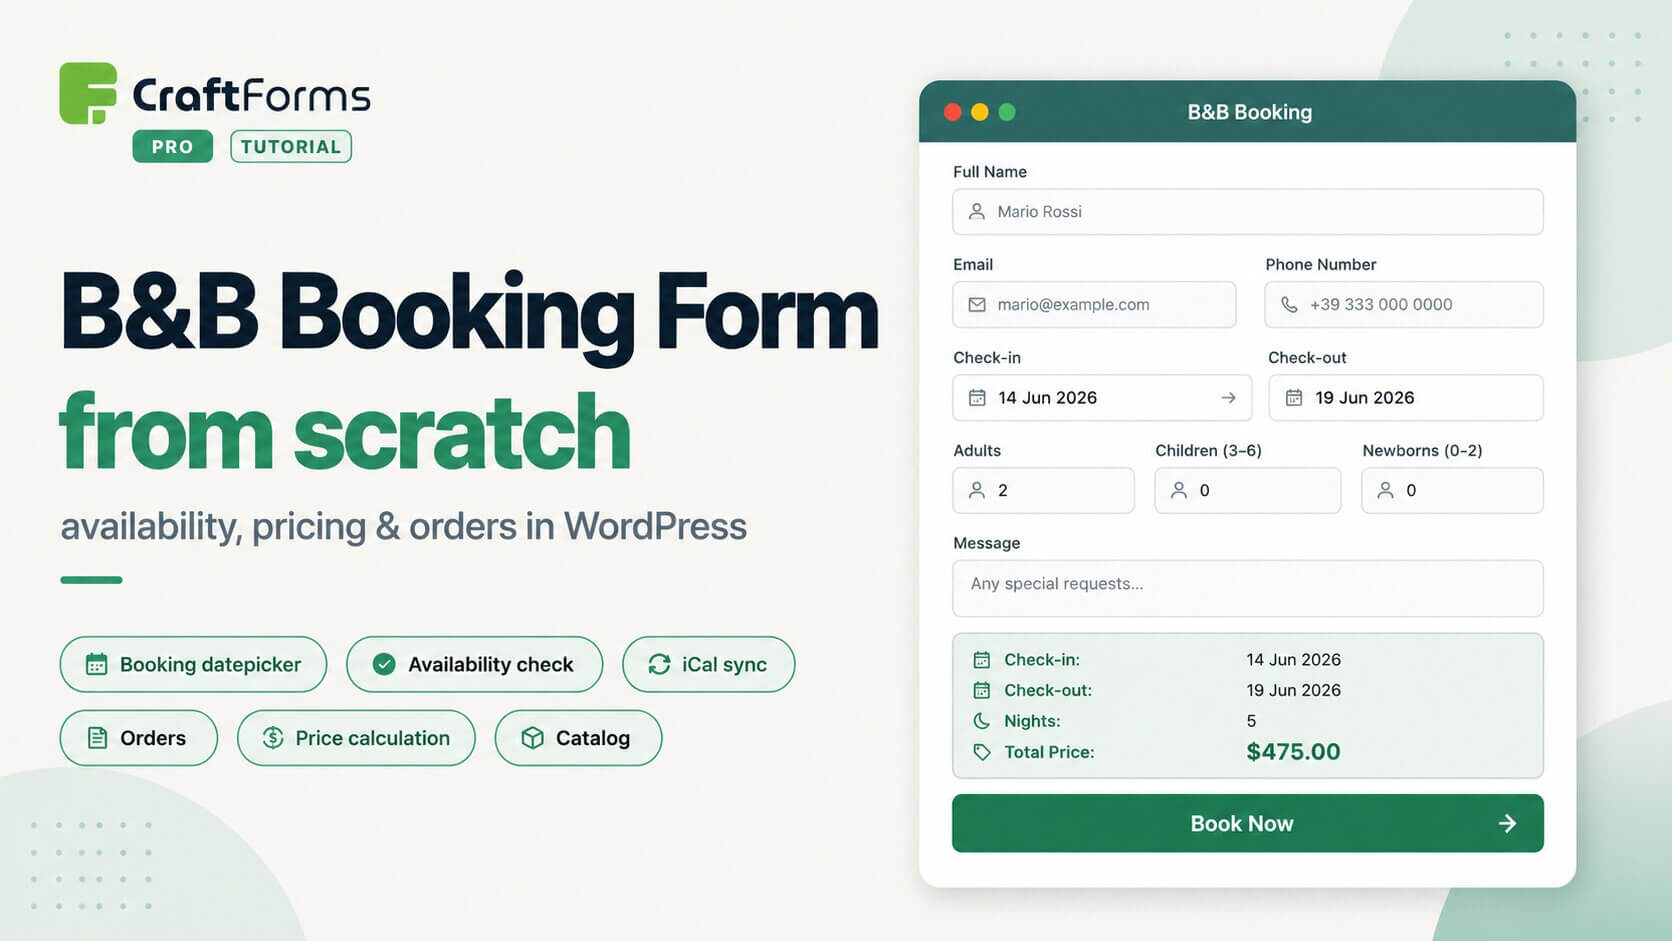
    A full walkthrough of building a real accommodation booking form in CraftForms Pro. The form covers all the standard fields — guest name, email, phone, check-in/check-out datepicker, adults and children counts, and a message field — with live price calculation based on number of nights and a summary block that updates before the guest submits. Availability is tracked per date so confirmed bookings automatically block those dates for future visitors.

    The second part connects the form to a catalog item, turning each submission into a tracked order with a full status lifecycle. It is not covered in the video, but CraftForms has iCal sync — importing feeds from external booking system automatically, and exporting a private feed so external platforms stay in sync. No WooCommerce, everything inside WordPress.

    Link to the tutorial on YT: https://www.youtube.com/watch?v=QcBEftYyi1A