
TL;DR
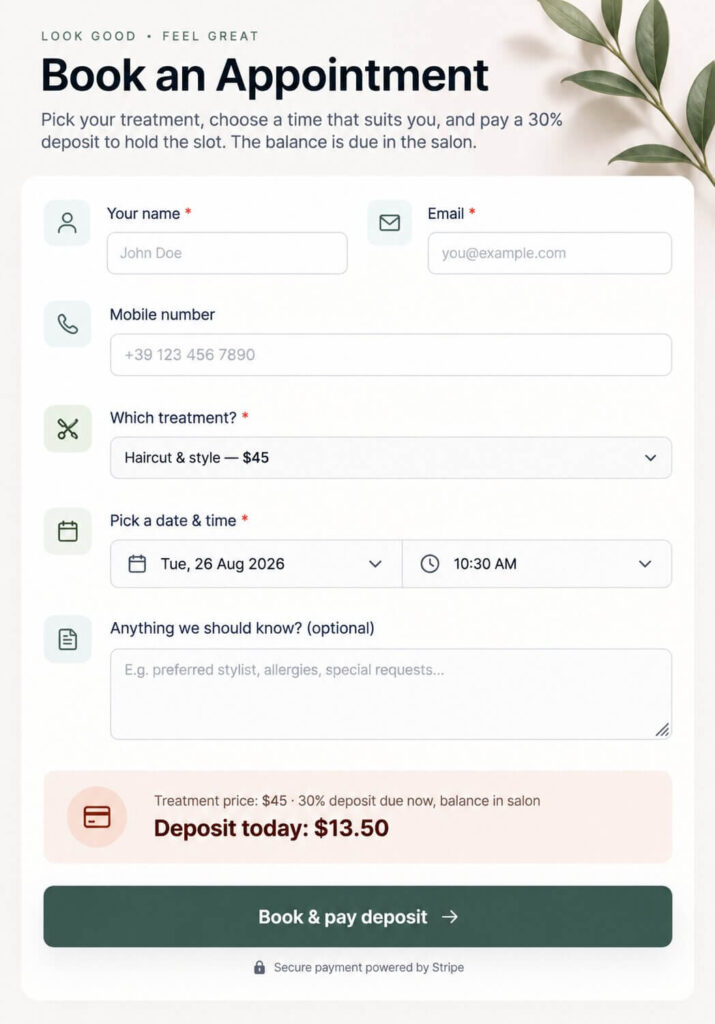
- A salon booking form needs three things a contact form can’t do: show only the times you’re actually free, stop two clients grabbing the same 2 p.m. slot, and take a deposit that depends on which treatment was chosen.
- CraftForms splits that across two pieces. The Booking Datepicker Field in Single Date (Optional timeslots) mode draws the calendar. A Catalog item in Single Date With Time Slots mode holds your real hours, slot length, buffers and capacity — and it’s the only thing that checks availability.
- The connection between them is made on the page where the form is embedded, not inside the form editor. That trips people up, so it gets its own section.
- One Catalog item = one bookable resource (a chair, a room, a therapist). Not one per service. Services live in the form as a choice field; each option carries its own price.
- The deposit is just a price formula. A Linked smart variable reads the selected option’s price, and the formula
service_price * 0.3charges 30% of it — recalculated on the server at submit, so the browser can’t change what’s charged. - Everything lands in CraftForms → Orders, and the slot is held the moment the form is submitted — before the card even clears.
If clients still book you by text, phone, or DM, you’re the bottleneck. Every appointment means a back-and-forth: “Are you free Thursday?”, checking your book, replying, waiting for confirmation, and then hoping the client doesn’t ghost you after all that. Multiply that by every new booking, every reschedule, and every “just checking my slot is still there” message, and you’re spending hours a week doing something a form should do in seconds.
The fix most people reach for is a dedicated booking app — Calendly, Fresha, Acuity. They work, but they live on someone else’s domain, look nothing like your brand, and usually charge you monthly whether you use them or not. If you’re already running WordPress, you can put the exact same booking experience — pick a date, pick a time, pay a deposit, get a confirmation — directly on your own site, styled the way you want it.
This guide builds that from scratch with CraftForms.
What You’ll Need
- WordPress with CraftForms Pro installed — the booking datepicker field, the Catalog (availability tracking), Payments and Orders are all Pro features
- A Stripe (or PayPal) account — free to create at stripe.com, only takes a per-transaction fee
- About 30 minutes. You build one form and one Catalog item per bookable resource — adding a fifth treatment to the menu later is a one-line change to a dropdown, not a new setup
Step 1 — Why Calendly or Fresha Often Isn’t the Right Fit
Third-party booking apps solve availability and double-booking, but they come with trade-offs that matter for a salon or spa:
- It’s not your brand. The client clicks “Book Now” and lands on a generic scheduling page with someone else’s logo, someone else’s colours, and often someone else’s ads.
- It’s a recurring cost regardless of volume. Most of these tools charge a monthly fee per staff member or location, whether you had two bookings or two hundred that month.
- Payment and booking are two different systems. Taking a deposit usually means bolting on yet another integration, or sending clients to a separate checkout page.
- Your data lives somewhere else. Client names, appointment history, and payment records sit in a third-party dashboard instead of your own WordPress database.
Building the booking flow inside CraftForms keeps everything — the form, the calendar, the payment, and the client record — on your own site, styled to match the rest of your business.
Step 2 — Build the Form
Go to CraftForms → Forms, click Add New, and name it — e.g. “Salon & Spa Appointment.”
The client’s details
Add a Text Input Field for the name, a second one with Type: Email for the email address, and optionally a third with Type: Tel for a mobile number. Nothing unusual here.
The treatment menu, with prices attached
Add a Select Field (or a Radio Field if you’d rather show the options laid out) named service. In its Options editor, give each option a label, a value, and — this is the part that matters — a price:
| Label | Value | Price |
|---|---|---|
| Haircut & style — $45 | haircut |
45 |
| Cut, colour & highlights — $95 | colour |
95 |
| 60-minute deep-tissue massage — $70 | massage |
70 |
| Signature facial — $65 | facial |
65 |
That per-option price is what the deposit formula reads in Step 4. You never type prices twice.
The date & time picker
Insert the Booking Datepicker Field block. In Form Field Type, choose Single Date (Optional timeslots) — the client picks one calendar date, then one time on that date. (The other modes are for date ranges: Dates Range for hotel-style check-in/check-out, Continuous Duration for meeting rooms, Seasonal for rentals whose slot times change by month.)
Name the field something you’ll recognise in templates — appointment works. The field’s help text tells you what that name gets you: {{field.appointment.date}} and {{field.appointment.time}}.
The Time Slots panel on this field is a fallback, not your schedule. Once you connect a Catalog item in Step 3, the item’s Business Hours, slot interval, notice period and real availability take over completely, and the field’s own copies are ignored. Set your hours there, once — don’t try to keep two copies in sync.
Finish with a Textarea Field for notes, an InfoBlock showing the running total, and a Submit Button — label it something that reflects what happens next, like “Book & pay deposit.”
Step 3 — Prevent Double-Bookings with a Catalog Item
This is the piece that stops two clients from booking the same 2 p.m. slot. Go to CraftForms → Catalog and add a new item.
One item per resource — not per service
Name it after the thing that can only be in one place at a time: “Serenity Spa — Treatment Room 1”, or the therapist’s name if you’re a one-person studio.
It’s tempting to create one Catalog item per service — “Haircut”, “Massage”, “Facial” — but that quietly breaks the thing you came here for. Each item tracks its own availability, so a 2 p.m. haircut booking wouldn’t block the 2 p.m. massage slot, and you’d end up double-booked on the same chair. Services belong in the form’s dropdown; the Catalog item is the chair.
If you have three chairs and any of them will do, that’s not three items either — it’s one item with Occupancy Model: Shared (multiple practitioners) and Capacity: 3. Use separate items only when clients genuinely book a specific person or room.
The Booking settings
- Type: Booking (this can’t be changed after the item is created, so get it right first time)
- Booking Type: Single Date With Time Slots (Appointments / Rentals)
-
Availability Window — From
Dynamic/ 0 days from today, UntilDynamic/ 60 days. This is how far ahead clients can book; without it the calendar stretches pointlessly into next decade -
Business Hours — tick the days you’re open and set opening and closing times per day. In this mode each day also gets an optional Break — set it to
13:00–14:00and no slot will be offered that overlaps lunch

Scheduling: interval and buffers
This is the part worth reading slowly, because the names are easy to misread.
-
Slot interval (min) — the length of one appointment, not the gap between start times. Set
60for hour-long treatments. -
Buffer before / Buffer after (min) — cleanup or setup time reserved around each appointment. These widen the grid: start times land every
interval + before + afterminutes. With a 60-minute interval and a 15-minute buffer after, a 09:00 open produces 09:00, 10:15, 11:30, … — each client gets their hour, and you get a quarter of an hour to reset the room. -
Notice (min) — the minimum lead time before a slot can be booked.
1440requires 24 hours’ notice;0lets someone book the next slot going.
Custom Availability, just below, is where one-off exceptions go — a public holiday you’re closed, or a Sunday you’re opening specially. It overrides the weekly pattern for named dates without you touching Business Hours.
Tell it which field to watch
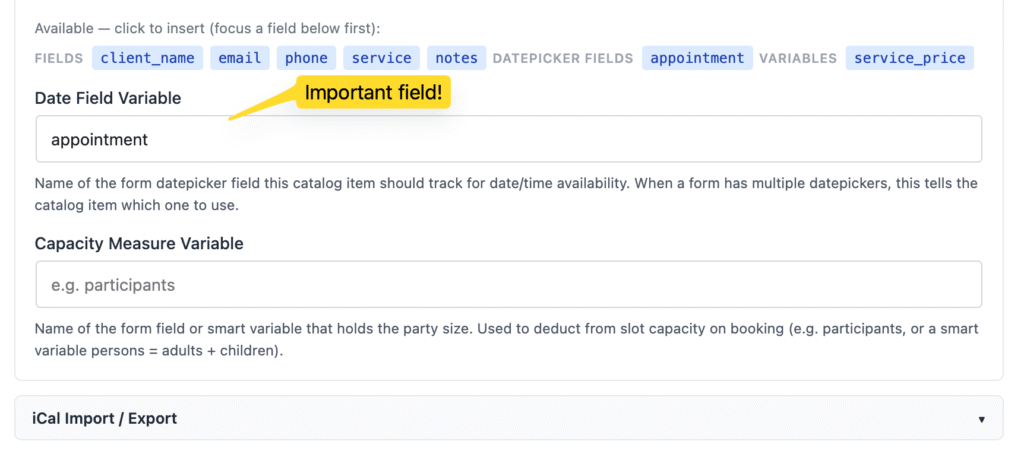
Scroll to Date Field Variable and type the name of your datepicker field — appointment. On a form with a single datepicker you can leave this blank and it will match anything, but naming it is a good habit and it’s required the moment a form has two.
Step 3b — Connect the Catalog Item to the Form
Here’s the step that isn’t where people look for it: the connection is made on the page where the form is embedded, not in the form editor.
When you save a CraftForms form, CraftForms generates a synced pattern for it. You place the form on a page by inserting that pattern — never by copying the form’s blocks into the page. Then:
- Edit the page and click the inserted form (the synced pattern block).
- Either use the Catalog Item button in the block toolbar, or open the document sidebar and find the CraftForms Catalog panel.
- Pick your item from Linked Catalog Item, and update the page.

Because the link lives per placement, the same form can appear on two pages linked to two different rooms. That’s the whole reason it’s wired this way.
Once connected, the calendar stops being decorative. It calls your site for real availability, greys out days with nothing free, and lists only the open times for the day the client picks.
What happens when someone books
The slot is held at submission — not when the payment clears. CraftForms creates the order, atomically reserves the date-and-time row against the item’s capacity, and only then captures the payment. If two people hit submit on the same slot within the same second, exactly one reservation succeeds; the loser’s order is cancelled and no money moves. You never maintain an availability calendar by hand.
Step 4 — Charge a Deposit with Stripe
CraftForms has no separate “deposit” toggle, and doesn’t need one. A deposit is a price formula that returns a fraction of the treatment price.
Read the selected treatment’s price
Open Smart Variables in the form’s document sidebar and add a variable:
- Type: Linked
-
Variable name:
service_price -
Linked field:
service(your treatment dropdown) - Lookup value: Price
-
Default value:
0 - Expose as field variable: on, so you can print it in an InfoBlock
A Linked variable builds its lookup table from the field’s own options at render time — pick a different treatment and service_price follows, with no table for you to maintain.
Write the formula
In the Pricing panel, click Manage Price Formula:
service_price * 0.3
Swap 0.3 for 0.5 for a half-deposit, or use service_price on its own to take the full amount up front. No round() needed — CraftForms rounds the price result for you. Whatever you write is recalculated on the server at submission — the number the browser sends is checked, never trusted.
You can show both figures live in your InfoBlock:
Treatment price: {{form.currency}}{{field.service_price}} · 30% deposit due now
Deposit today: {{form.currency}}{{form.price}}
Set your currency
CraftForms → Settings → Ecommerce holds the Default currency and the Number format (1,234.56 vs 1.234,56 and friends). These are site-wide, not per form.
Add a payment connection
CraftForms → Settings → Payments has two parts.
Redirect URLs at the top: a Payment success URL (a page you create with the Order Summary block on it) and a Payment cancel URL (usually the booking page itself).
Payment Connections below it: click Add Payment Connection and fill in
- Name — e.g. “Stripe — Salon (Test)”. Connections are named because you can have several
- Gateway — Stripe (can’t be changed after creation)
- Mode — Test or Live. One connection carries one set of keys, so make a separate connection for your live keys rather than editing this one later
-
Publishable key (
pk_…) and Secret key (sk_…) -
Webhook — copy the Webhook URL shown here into your Stripe Dashboard under Developers → Webhooks, then paste the Webhook signing secret (
whsec_…) back in. This is what flips an order to paid once Stripe confirms the charge
We have a video tutorial about Stripe payment integration & configuration. It shows exactly how to connect Stripe account. Since version 1.8 the UI is slightly changed in CraftForms, but the principle remains.
Add the Payment block
Back in the form, drop a CraftForms Payment block in above the submit button. In its sidebar:
- Payment Gateways — choose your Stripe connection. (Leave both dropdowns on “None” and the block won’t render at all on the front end.)
- Payment Mode — Hosted Checkout redirects to Stripe’s page and back to your success URL; Embedded Payment puts the card fields inline on the form.
- Customer Data — map your email and name fields so Stripe gets a real customer identity and can send its own receipt.
There’s no “create an order” action to add. When a Catalog item is linked, order creation happens automatically, before your other submit actions run.
Step 5 — Send a Confirmation Email
The Stripe receipt says what was charged. It doesn’t say when to turn up. Add a Send Email action in Submit Actions:
-
Send To:
{{email.email}} -
Subject:
Your appointment at {{site.name}} is booked - Body:
Hi {{email.client_name}},

Your appointment is confirmed.

Treatment: {{email.service}}
Date: {{email.appointment.date}}
Time: {{email.appointment.time}}

Deposit paid: {{email.currency}}{{email.price}}
The balance is due in the salon.

Need to move it? Just reply to this email.

— {{site.name}}
The tags worth knowing:
| Tag | Gives you |
|---|---|
{{email.<field>}} |
The field’s display value — a choice field returns the option label, not its slug |
{{email.appointment.date}} / .time
|
The two halves of the booking field, separately |
{{email.price}} |
The charged amount, formatted to your Number format setting |
{{email.currency}} |
The currency symbol |
{{site.name}}, {{date.now}}
|
Site and timestamp context |
Then tick Attach booking calendar invite (.ics) on the action. The client gets a one-click “add to calendar” file with their appointment in it — the single highest-value box on that screen for a business that lives on people showing up.
For a branded HTML email — logo, colours, layout — build one under CraftForms → Email Templates and use the Send Email (Template) action instead, which carries the same .ics option.
If you want your whole schedule in your own calendar app, the Catalog item’s iCal Import / Export section gives you a subscribable export feed — and an import field that blocks dates pulled from another platform’s calendar, if you’re still winding one down. There’s a fuller walkthrough in our guide on syncing CraftForms bookings to Google Calendar.
Step 6 — Managing Appointments from the WordPress Admin
Every booking appears in CraftForms → Orders with the client, the treatment, the appointment date and time, the amount, and the payment status. Opening one shows every submitted field and the Stripe payment reference.

Statuses run pending → confirmed → paid → refunded. A deposit order simply shows the deposit as its total; collecting the balance in the chair is your own process, not something the order tries to model.
The raw submissions are kept separately under CraftForms → Submissions, so you keep the enquiry record even for bookings that never got paid.
What Else Can You Build With This?
The same mechanism — a Catalog item, Business Hours, slot interval, buffers, advance notice — covers anything where a customer picks one date and one time: tutoring sessions, consultations, test drives, guided tours, photo-studio sittings. Only the pricing changes shape. A tour operator on this exact setup prices per head with a formula as short as participants * 15, and caps the party size against the slot’s remaining capacity.
If your customers pick a duration rather than a fixed slot — a meeting room booked for 90 minutes starting whenever — that’s the Continuous Duration booking type instead, and it deserves its own walkthrough.
Summary
- A form with a Select Field carrying per-option prices, and a Booking Datepicker Field in Single Date (Optional timeslots) mode
- A Catalog item per bookable resource — hours with breaks, slot length, buffers, notice period, availability window, capacity
- The two connected on the page, via the synced pattern block’s Catalog Item control
- A Linked smart variable reading the chosen treatment’s price, and
service_price * 0.3turning it into a deposit — recalculated server-side - A named Stripe Payment Connection plus the Payment block, with the slot held at submission and released automatically if the charge fails
- A confirmation email carrying the date, the time, the amount, and an .ics invite
- Every booking in Orders, with your own schedule available as an iCal feed
No per-seat monthly fee, no client leaving your site to pay someone else, and the whole client record in your own database.