Category: Articles

  • Best WooCommerce Product-Configurator Plugins (2026)

    Best WooCommerce Product-Configurator Plugins (2026)

    WooCommerce is superb at selling products with a small, fixed set of choices — a T-shirt in three sizes and two colours is six variations, and the built-in attribute-and-variation system handles it cleanly. The trouble starts the moment your product needs more: an engraving line, a photo upload, a made-to-measure size, a price that depends on a formula, or an option that should draw down real stock. Native WooCommerce has no answer for those, so you reach for a product-options or configurator plugin.

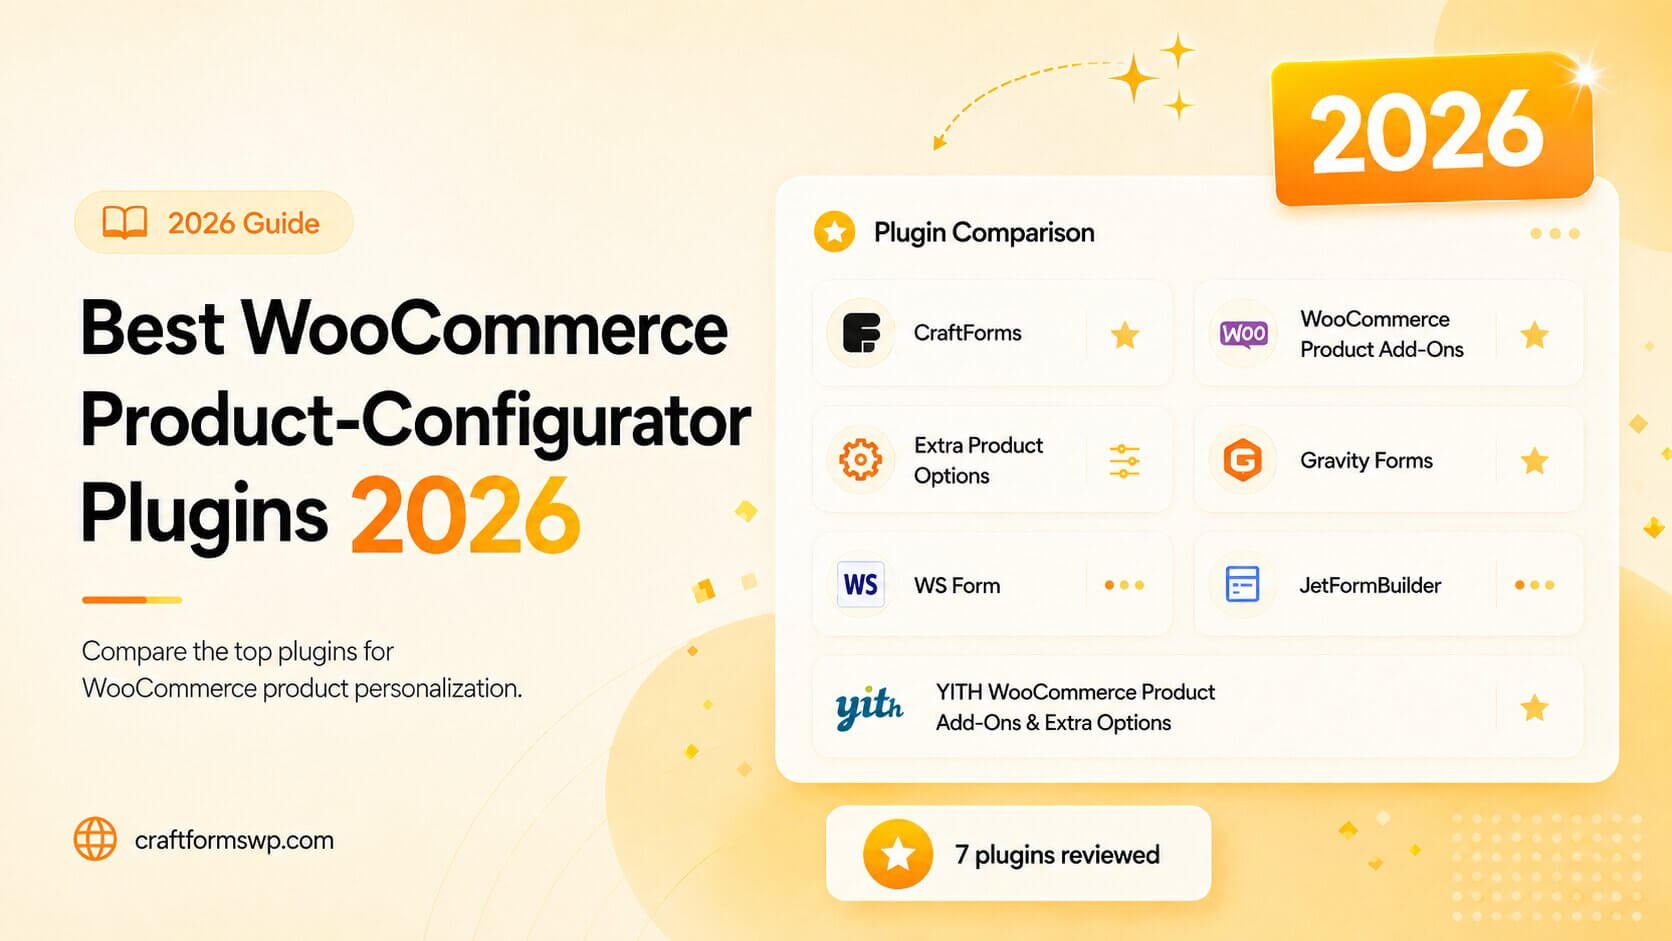
    There are a lot of them, and they are not interchangeable. Some are simple “add a text field to the product page” tools; others are full pricing engines; a few are form builders that add a WooCommerce bridge. This guide runs through the six that matter most in 2026 — what each supports and where each stops — so you can match the tool to the hard part of your product.

    What to look for in a configurator plugin

    The dimensions that actually separate these plugins. Each solution below is tagged against them, so you can scan for the ones you need:

    • Field types & swatches — colour/image swatches, file uploads, date pickers, not just text and dropdowns.
    • Conditional logic — show or hide options based on earlier answers, so customers never see impossible combinations.
    • Formula & lookup pricing — flat/percentage fees are table stakes; formula pricing (base × area × rate) and lookup tables (quantity tiers, size grids) are where the hard cases live.
    • Custom quantities & dimensions — can it price any value, not just the presets you typed in? This is the “hundreds of variations” trap in disguise.
    • Option-level inventory — does selecting an option draw down real stock, or is it just a display field?
    • Server-side price validation — is the final charge computed on the server, or can a customer tamper with the browser’s number?
    • CSV price editing — can you update a big price list in a spreadsheet instead of clicking through rows?
    • Scope — WooCommerce-only, or can the same tool build forms elsewhere on your site?

    1. CraftForms

    A native-Gutenberg form builder with a WooCommerce integration, so a configurator is built from the same blocks as any other form — you drop fields into the block editor, wire up their logic, and an Info block shows a running total that updates live as the customer chooses.

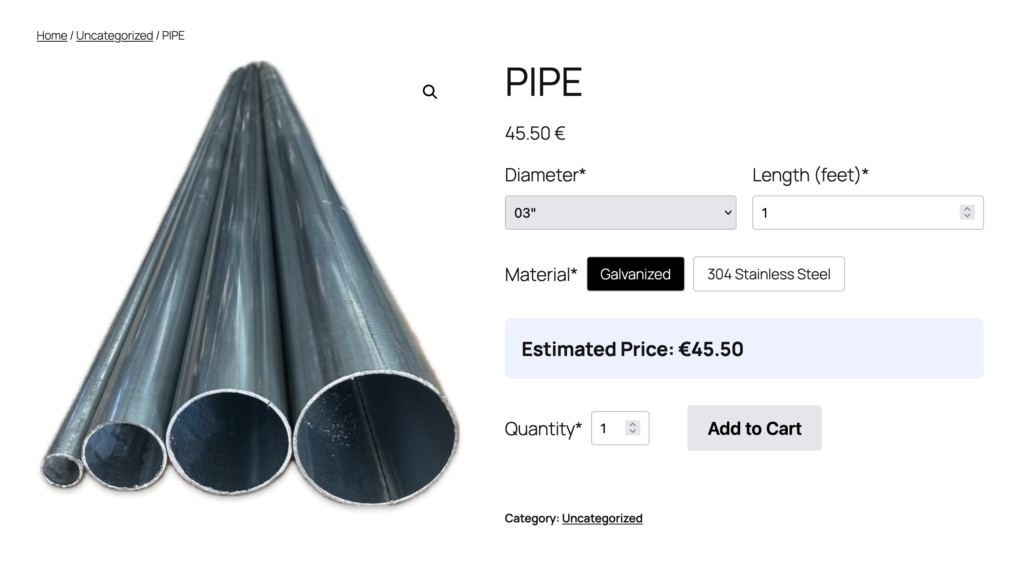
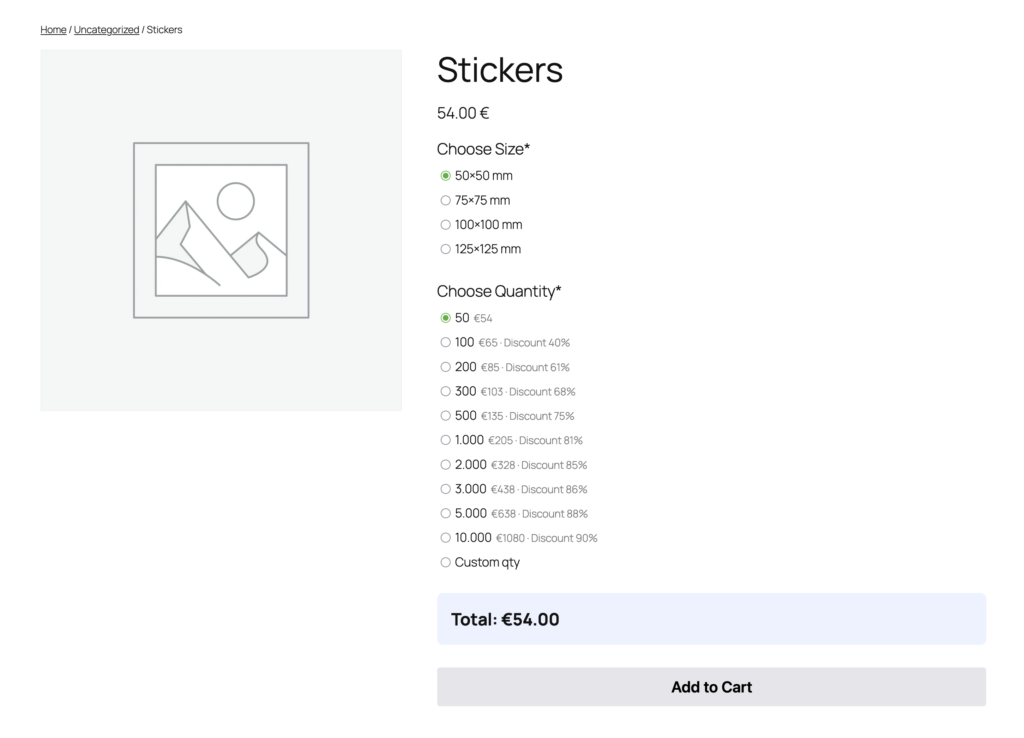
    There are ready-made starters (a quantity-tier sticker product and a formula-priced pipe etc) let you load a complete working setup and inspect every rule rather than building from scratch.

    Its standout is doing the two hard things at once. First, rule-based pricing: instead of a row per combination, you write a price formula (diameter_price × material_coef × length) and use a price matrix whose “Closest up” lookup prices custom quantities and dimensions correctly — order 137 and it lands on the right tier, which native variations physically can’t do. The pricing tables import and export as CSV, so onboarding an existing price sheet or bumping every price 5% is a spreadsheet paste, and the live figure is re-evaluated on the server at submit so the charged amount is never taken from the browser. Second, inventory by option: a Dynamic SKU built from the selections plus a stock table draws down real stock and blocks oversell without a single WooCommerce variation — and the same option values can drive product weight, dimensions, and shipping class.

    On top of that it ships interactive elements no rival here has: an Image Cropper (customers crop, flip, and filter an uploaded photo in-form, aspect-locked and saved with the order), a Layered Image live composite preview, and a product image viewer that swaps the main image as options change. And because it’s a form platform first, the same tool builds contact forms, bookings, and standalone Stripe payments with no WooCommerce at all. The catch: it bridges into WooCommerce rather than being a native extension. The WooCommerce integration and the above are Pro.

    Supports: swatches · conditional logic · formula & lookup pricing · custom quantities & dimensions · option-level inventory · server-side validation · CSV price editing · dedicated interactive elements (cropper, layered image) · works outside WooCommerce.

    Doesn’t: edit-from-cart · mix-&-match bundles · swatches from native attributes (limited)

    Price: free tier; Pro $59.99/yr or $149.99 lifetime, unlimited sites.


    2. WooCommerce Product Add-Ons

    The official add-on from the WooCommerce team attaches simple fields — text and textarea, checkboxes, dropdowns, a file upload, and a customer-entered “custom price” — with a flat or percentage fee per option. You can group add-ons and apply them per product or across a category, mark them required, and the choices show up cleanly in the cart, the order, and the confirmation email with no glue. Its whole appeal is trust and simplicity: it’s built by the WooCommerce team, tested against every release, set up in five minutes, and carries zero third-party risk — for a lot of stores that reliability is worth more than features.

    Those features are exactly what’s missing, though. Pricing is purely additive (a fee on top of the base), so there’s no formula engine, no lookup tables, and no way to multiply or replace the price; there’s no conditional logic to hide irrelevant options; and nothing tracks stock for the options you add. It tops out at “add gift wrap (+£3)”. For a coffee shop’s “extra shot (+50p)” or a “add a gift message” field it’s ideal; for made-to-measure or tiered pricing it isn’t the tool.

    Supports: basic fields · file upload · flat/percentage fees.

    Doesn’t: conditional logic · formula/lookup pricing · custom quantities · option inventory · works outside WooCommerce.

    Price: €71/yr, single site (no free version).


    3. WooCommerce Extra Product Options

    Formerly “TM Extra Product Options”. It offers more than twenty field types (text, selects, radio/checkbox with image and colour swatches, date/time, file upload) organised into sections and tabs with tooltips and per-field styling, a genuine conditional logic engine, and a math/formula feature that can add to, modify, or fully override the product price or weight — including quantity-based and character-count pricing. That breadth handles genuinely complex products, and the plugin is actively maintained.

    The settings UI is dense and has a real learning curve — there are a lot of options, and building a big configurator takes patience. Like the rest of the specialists, it has no inventory per option combination and does nothing outside WooCommerce.

    Supports: swatches · conditional logic · formula pricing · file upload.

    Doesn’t: option inventory · CSV price editing · works outside WooCommerce.

    Price: $49/yr for 1 site to $229/yr for 250 sites


    4. Advanced Product Fields for WooCommerce

    The best-reviewed focused option here (4.8/5, 50,000+ active installs on wp.org) and the one that most obviously prioritises quality over feature-count. Its admin is modelled on Advanced Custom Fields, so it feels immediately familiar to WordPress developers, and the plugin is built to be lightweight — a deliberate “zero-bloat” stance that keeps product pages fast. The free version is genuinely useful on its own (around ten field types, conditional logic, and flat-fee pricing), which makes it easy to trial before paying.

    Its sharpest trick is generating option swatches automatically from your WooCommerce attributes with zero setup — nobody else here does that as cleanly. Higher tiers add conditional logic, formula pricing, and lookup-table (conditional) pricing, file uploads with previews, and a date picker. Two extras genuinely set it apart: customers can edit their selections from the cart without starting over, and an add-on adds a mix-&-match bundle builder; it also ships real, tested WPML/Polylang and multi-currency support. What it deliberately doesn’t do is reach beyond the product page: it can’t generate a SKU from options or track option stock, and there are no standalone forms.

    Supports: attribute-native swatches · conditional logic · formula & lookup pricing · file upload · cart editing · bundles (add-on).

    Doesn’t: option inventory · dynamic SKU · works outside WooCommerce.

    Price: free tier; Pro from $69–$199/yr, single site; $399–$999/yr, for 20 sites.


    5. YITH WooCommerce Product Add-Ons & Extra Options

    YITH’s entry does the expected job well. You build “blocks” of options and choose where they appear — all products, specific products or categories, or particular user roles — using field types like radios, dropdowns, text boxes, checkboxes, colour/label swatches, file upload, and date, each able to carry a fixed, percentage, or quantity-based cost. There’s a capable free version, and the premium tier unlocks the swatches, per-role visibility, file uploads, and finer display control.

    Its real draw is consistency: if you already run YITH plugins (or their membership bundle), this one matches the admin conventions, update cadence, and support channel you already know, and it plays nicely with the rest of the YITH catalogue. What it isn’t is a pricing or inventory engine — the model is fee-per-option rather than true formulas or lookup tables, there’s no stock tracking per option combination, and it does nothing outside WooCommerce. It’s a solid, unsurprising middle-of-the-road choice.

    Supports: fields & sections · swatches · per-option fees · partial conditional logic.

    Doesn’t: formula/lookup pricing · option inventory · works outside WooCommerce.

    Price: premium €119/yr, single site.


    6. Form builders with a WooCommerce integration (Gravity Forms, WS Form, JetFormBuilder)

    These are form builders that added a WooCommerce bridge, so a form you’d use for lead capture can instead drive a product page — and you inherit a mature logic and calculation engine that’s often deeper than the dedicated options plugins’:

    • Gravity Forms is the developer’s default: robust conditional logic, calculation fields, and a huge add-on ecosystem. Its WooCommerce Gravity Forms Product Add-Ons extension attaches a form to a product and flows the fields into the cart and order.
    • WS Form is built around a strong calculation engine and a large field library with a visual “Styler,” and its WooCommerce add-on turns a form into a configurator with calculated pricing and add-to-cart.
    • JetFormBuilder (Crocoblock) is free at its core, Gutenberg-native, and a natural fit if you’re already in the Elementor/Crocoblock stack; WooCommerce actions let a submission add a configured product to the cart.

    The shared trade-offs are real: WooCommerce support is a paid add-on or higher tier stacked on top of the base plugin, so you’re buying (and maintaining) two products; none of them track inventory per option combination; and the product-page experience is less native than a purpose-built options plugin, with more wiring to get right. Best when you already own and love one of these builders and want to reuse it. This is also the family CraftForms belongs to — a form builder with a WooCommerce integration — which is what makes the head-to-head so direct.

    Supports: conditional logic · formula pricing · file upload · works outside WooCommerce (the builder itself).

    Doesn’t: option inventory · native product-page UX (WC support is a separate add-on).

    Price: base builder + a paid WooCommerce add-on/tier — e.g. Gravity Forms from $59/yr + the WooCommerce add-on ~$99/yr; WS Form PRO from ~$79/yr + WooCommerce add-on; JetFormBuilder free core, Pro from $49/yr per 1 site or $499 LTD.


    How to choose — by what you actually need

    Start from the hard part of your product, then read across to the tool:

    • Just a few flat or percentage surcharges (gift wrap, extra shot, engraving fee)? → WooCommerce Product Add-Ons.
    • Unique product presentation / dedicated image editor?CraftForms
    • Attribute-native swatches with zero setup? → Advanced Product Fields or Extra Product Options.
    • Lots of field types + conditional logic at a one-time price? → Extra Product Options.
    • Editing selections from the cart, or mix-&-match bundles? → Advanced Product Fields.
    • Reuse a form builder you already own? → Gravity Forms, WS Form, or JetFormBuilder with its WooCommerce add-on.
    • Formula, tiered, or continuous pricing that must handle custom quantities and dimensions? → CraftForms (Extra Product Options and APF do formula pricing too; CraftForms’ closest-up lookup is what prices the 137-unit order correctly).
    • Options that track real stock, or a visual configurator (customers crop their own photo, see a live composite preview)? → CraftForms — the only tool here that does either.
    • One tool that also builds forms outside WooCommerce — contact, bookings, standalone Stripe? → CraftForms.

    For simple fees, the official add-on is genuinely the right call, and each specialist above owns its niche. The field narrows once your products need configurable pricing that also respects inventory, or a configuration that’s visual and interactive — that combination is where CraftForms is hard to match.

  • Track WooCommerce Stock by Option — No Variations

    Track WooCommerce Stock by Option — No Variations


    TL;DR

    • Popular add-on plugins (WooCommerce Product Add-Ons, TM Extra Product Options, YITH) let you add fields to a product, but those fields are display only — they don’t draw down stock.
    • WooCommerce’s own answer, variations, can track stock per combination — but you have to create every combination by hand, which explodes into hundreds of rows (the “196 / 640 variations” trap).
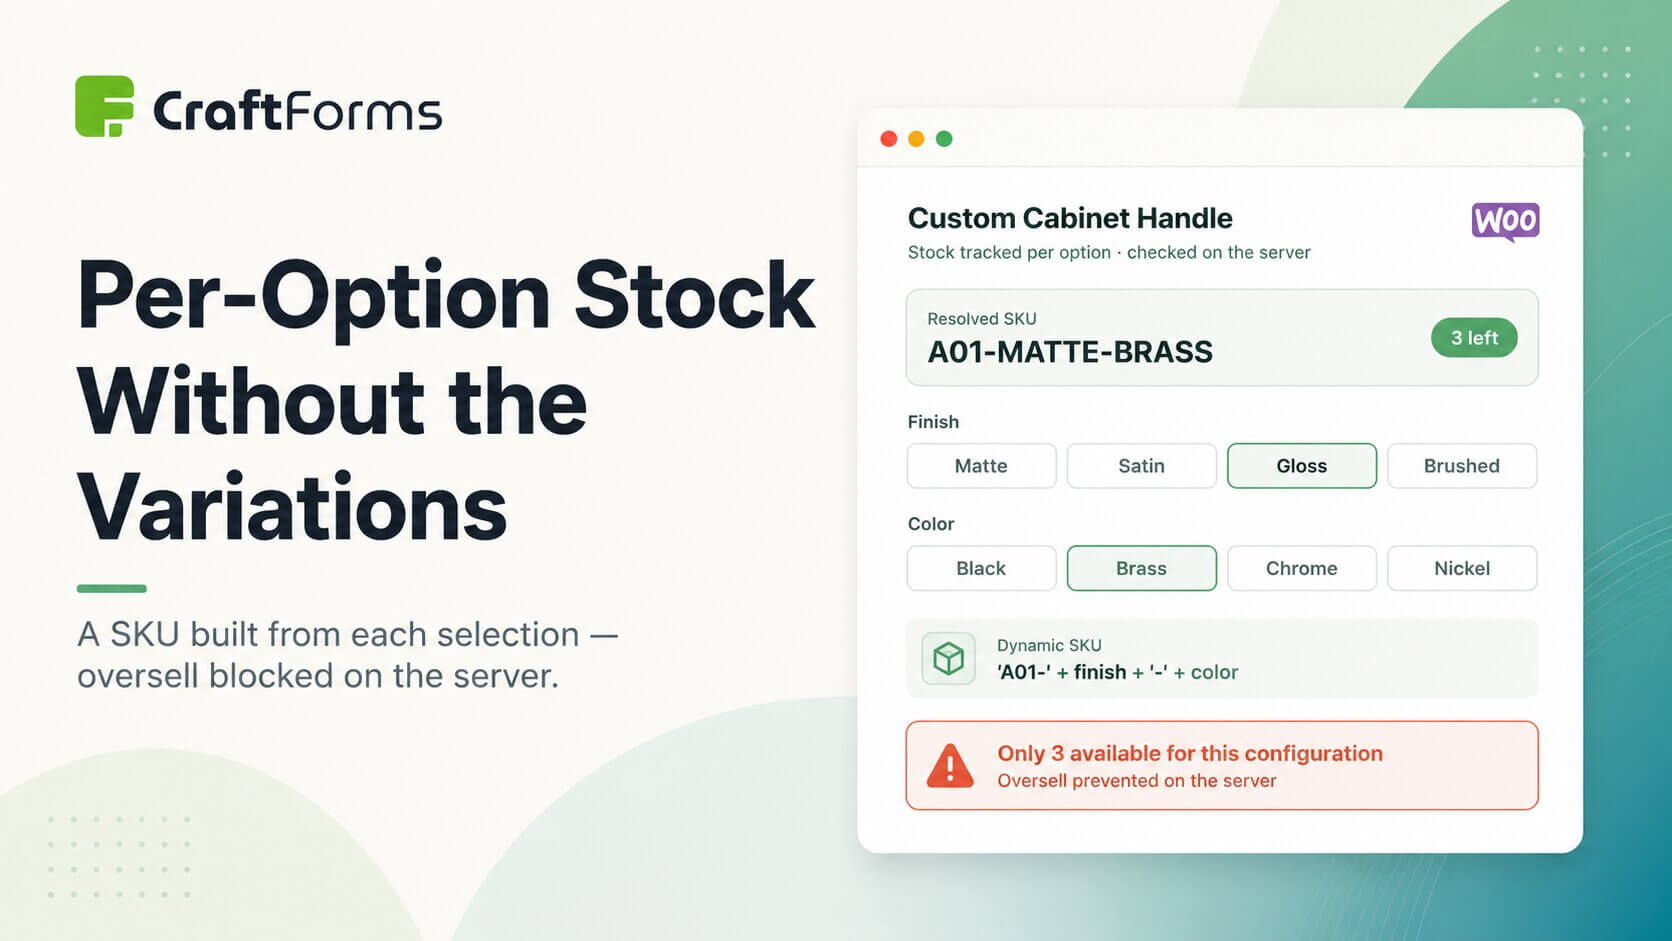
    • CraftForms tracks stock per option combination instead: a Dynamic SKU Expression builds a SKU from the customer’s selections, and a Custom Stock Management table maps each resolved SKU to a quantity.
    • On add-to-cart, the requested quantity is checked against that SKU’s stock on the server and blocked if it would oversell — no variation matrix required.
    • The resolved values are exposed as wc_sku and wc_stock, so you can reuse them in your pricing and on-page messaging formulas.

    The running example in this guide is a Custom Dining Table configurator built with CraftForms. The customer picks a wood type (oak, walnut, ash), a size (150x90, 180x100, 200x110), and a leg style (black-metal, brass, oak-wood, hairpin), optionally adds engraving, and sets a quantity. Those three option fields — wood_type, size, legs — are the axes we’ll track stock against.

    The features in this guide are part of CraftForms Pro and require the WooCommerce integration.


    The problem: add-ons take orders, but they don’t count stock

    If you sell configurable products, you’ve almost certainly reached for an “extra product options” or “product add-ons” plugin. They’re great at one thing: putting extra fields — a colour, a size, an engraving, a finish — onto the product page so customers can configure what they want.

    What they’re not built to do is track inventory for those options. The add-on field is a label that travels with the order; it isn’t connected to any stock count. So if you have 8 black handles and 3 brass ones, nothing stops a customer ordering 10 brass. You find out when you go to fulfil the order.

    This is one of the most repeated complaints in the WooCommerce community — phrased as “alternatives to YITH product options that actually track inventory,” “product options with stock control,” and “variable products with inventory per attribute.” People want the rich configuration of an add-on plugin and real stock control. Normally you can’t have both.

    Why variations aren’t the answer either

    WooCommerce does track stock per combination — through variations. The catch is that a variation is a finished, pre-built row: you have to create every combination in advance, set its stock, and maintain it.

    That’s fine for a T-shirt (3 sizes × 2 colours = 6 rows). It collapses the moment you have more than a couple of option axes:

    • Our dining table is modest by configurator standards — 3 woods × 3 sizes × 4 leg styles = 36 variations — and you’d still have to build and stock-manage all 36 by hand, before you even add engraving.
    • Push the axes a little — 4 sizes × 7 colours × 7 finishes = 196 variations — and you hit exactly the “196 variations, need an upgrade option that doesn’t create new inventory” scenario people describe.
    • Add one more axis and you’re into the “640 manual options for one product” territory.

    Every one of those rows is created and stock-managed by hand. Most shops give up and either drop options or stop tracking stock for them — which puts you right back at the first problem.

    The CraftForms approach: a SKU built from the selection, and one stock table

    CraftForms takes the middle path. You don’t pre-build every combination. Instead you describe, with one expression, how to derive a SKU from whatever the customer picked, and you keep a single table of how much stock each SKU has. Stock is then tracked per option combination — without a variation matrix.

    Two building blocks do the work, and both live in the same place: open the product, go to its CraftForms product settings, and expand the Inventory section (it’s open by default).

    1. Dynamic SKU Expression

    A small expression that returns a SKU string built from the form’s field values. For our dining table:

    'TBL-' ~ wood_type ~ '-' ~ size ~ '-' ~ legs
    

    If a customer selects walnut, the 180×100 size, and brass legs, this resolves to TBL-walnut-180x100-brass. The expression can reference any field or smart variable on the form (wood_type, size, legs here), so the SKU can encode as many option axes as you need.

    A few details worth knowing:

    • It’s optional. Leave it blank and CraftForms falls back to the product’s own WooCommerce SKU.
    • The resolved value is exposed to your other formulas as wc_sku, so you can reuse it in pricing or in a message on the page.
    • It’s evaluated on the server at submit from sanitised field data — the browser never gets to declare the SKU.

    2. Enable Custom Stock Management + the Stock Table

    Flip on Enable Custom Stock Management and a Stock Table appears. It’s a simple two-column table:

    SKUStock Qty
    TBL-oak-150x90-black-metal12
    TBL-walnut-180x100-brass3
    TBL-ash-200x110-hairpin7

    Each row maps a resolved dynamic SKU to the quantity you have on hand — e.g. only 3 walnut / 180×100 / brass tables are buildable because you have 3 sets of brass legs left. Decimal quantities are supported (useful for length- or area-based stock), and the table has Import CSV / Export CSV buttons — so you can edit your whole stock list in a spreadsheet and paste it back, instead of clicking through rows.

    When this is on, the available quantity is also exposed as wc_stock, so you can drive on-page messaging or pricing from it (more on that below).

    Wiring it to the dining table form

    On the Custom Dining Table product, the Inventory panel ends up looking like this:

    • Quantity Variable: qty — the number input the form shares with the Add-to-Cart button.
    • Dynamic SKU Expression: 'TBL-' ~ wood_type ~ '-' ~ size ~ '-' ~ legs — references the three option fields by name.
    • Enable Custom Stock Management: on.
    • Stock Table: one row per combination you actually stock, e.g. TBL-oak-150x90-black-metal → 12.

    The field names are what matter — they have to match the form. In this configurator the wood and leg pickers are rich image-card radio options and size is a select, but to the SKU expression they’re just wood_type, size, and legs resolving to clean, SKU-safe values (oak, 180x100, brass). That’s why the option values are kept short and slug-like even though the on-card labels read “Oak”, “Walnut”, etc.

    How oversell prevention actually works

    Here’s the flow when a customer hits add-to-cart, all of it server-side and authoritative:

    1. CraftForms evaluates your Dynamic SKU Expression against the submitted selections to get the resolved SKU (e.g. TBL-walnut-180x100-brass).
    2. It looks that SKU up in your Stock Table.
    3. It reads the requested quantity from the field you nominated as the Quantity Variable — on this form that’s qty (if you don’t set one, it assumes 1).
    4. If the requested quantity exceeds the available stock for that SKU, the add-to-cart is blocked with a clear message:

    Only 3 item(s) available for this configuration.

    Because this runs on the server before any cart operation, a tampered browser request can’t sneak an oversell through.

    One important rule to design around: a SKU that isn’t in the Stock Table is not restricted. The table is an allow-and-limit list, not a deny-by-default gate. So if you want every combination capped, make sure every resolvable SKU has a row. Combinations you deliberately leave out of the table will sell without a stock check — which is convenient for “made to order, unlimited” options, but a gotcha if you assumed missing = blocked.

    Putting wc_stock to work (beyond just blocking)

    Because the resolved stock is available as wc_stock in your other formulas, you don’t have to limit yourself to the hard block. A few patterns shops like:

    • Low-stock nudges — show “Only a few of these brass-leg tables left” when wc_stock drops below a threshold, using a smart variable feeding an on-page message.
    • Per-configuration pricing tied to availability — e.g. a small surcharge on a scarce leg style or wood.
    • Surfacing the SKU — echo wc_sku (TBL-walnut-180x100-brass) into the order/confirmation so fulfilment sees exactly which combination was bought.

    The point is that the same values powering the oversell check are first-class inputs to everything else CraftForms calculates.

    When native variations are still the right call

    Be fair to variations — they’re the right tool when:

    • You have a small, fixed set of combinations.
    • Each combination needs its own image, SKU, weight, and shipping treatment that WooCommerce manages natively.
    • You want those combinations to appear in WooCommerce reports as distinct products.

    CraftForms’ Dynamic SKU + Custom Stock Management is the answer when the combination count is large, when you don’t want to pre-build a matrix, or when you want rich option configuration (with live pricing) and real per-option stock control on the same product.


  • Sync Your CraftForms Bookings to Google Calendar

    Sync Your CraftForms Bookings to Google Calendar


    TL;DR

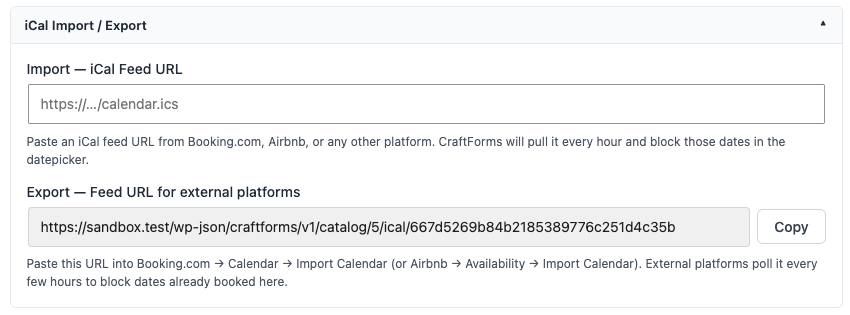
    1. CraftForms → Catalog → open your booking item → “iCal Import / Export” → copy the Export feed URL.
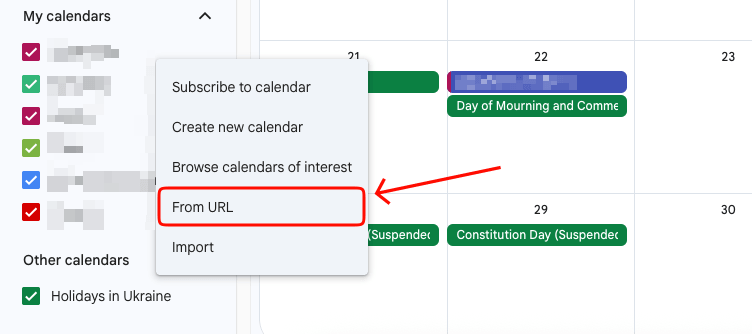
    2. Google Calendar → Other calendars → + → From URL → paste → Add calendar.
    3. Bookings appear as “Booked” blocks (no customer data). Google refreshes on its own schedule — great for planning, not for the second-by-second.
    4. Bonus: paste your Google Calendar’s secret ICS address into CraftForms’ Import field to auto-block your days off.

    Your bookings, in your calendar, on every screen you own — without lifting a finger after setup.


    You take a booking on your website. A few seconds later it’s sitting in your Google Calendar — on your laptop, on your phone, on the shared calendar your whole team watches. No copy-pasting. No “did anyone write that down?” No Zapier subscription, no third-party connector, no spreadsheet in the middle.

    That’s the whole promise of this post, and it’s built into CraftForms. Every booking taken through a CraftForms booking form can be published as a live calendar feed that Google Calendar — or Apple Calendar, or Outlook — subscribes to and keeps up to date on its own.

    If you run a B&B, a salon chair, a tutoring slot, a photography studio, a rental, or anything where “is that day free?” is a question you answer ten times a week, this is the feature that lets you stop answering it from memory.

    Here’s exactly how it works and how to set it up — plus the honest caveats nobody mentions until you’re already frustrated.


    Why bother? (Or: the problem with bookings that live in a database)

    CraftForms already does the hard part well. It stores every booking, prevents double-bookings, and shows availability in the date picker on your site. So why pull bookings out into Google Calendar at all?

    Because your business doesn’t live inside the WordPress admin. You live in your calendar — the one that buzzes your phone in the morning, the one your assistant checks before saying “yes, we can fit you in,” the one you glance at to decide whether you can take Friday off.

    When bookings sit in one place and your life sits in another, you get the two classic failures:

    • You forget. A booking exists, but it’s not in front of you when you’re planning your week.
    • You double-promise. You tell a friend you’re free Saturday because your personal calendar looked empty — but the website took a booking that morning.

    Subscribing Google Calendar to your CraftForms bookings closes both gaps. One source of truth, mirrored everywhere you already look.


    What the feed actually is (in plain terms)

    CraftForms exposes your bookings as an ICS feed — sometimes called an iCal feed. Don’t let the “iCal” name fool you; it has nothing to do with Apple specifically. ICS (.ics) is the universal, decades-old calendar format that every major calendar app understands: Google Calendar, Apple Calendar, Outlook, Thunderbird, all of them.

    A feed is just a special URL. When you give that URL to Google Calendar, Google quietly visits it every so often, reads the list of booked dates, and draws them onto your calendar as events. You never touch it again. New booking comes in? It appears at Google’s next check.

    The URL looks like this:

    https://yoursite.com/wp-json/craftforms/v1/catalog/12/ical/a1b2c3d4e5f6a7b8c9d0e1f2a3b4c5d6
    

    That long random string at the end is a security token — more on that below. The important thing: it’s read-only. Google can look, but it can’t change anything, and nobody who doesn’t have the exact URL can find it.

    Heads up — this is a CraftForms Pro feature. The booking catalog item and its ICS import/export feeds are part of CraftForms Pro. If you’re on the free version you’ll have forms, but not the booking calendar engine behind this article.


    Before you start: you need a booking item set up

    This post assumes you’ve already built a booking — a thing customers can reserve. If you haven’t, do that first; these walkthroughs cover it end to end:

    • B&B / vacation rental (check-in to check-out date ranges)
    • Salon / spa / appointments (fixed time slots on specific days)
    • Booking + automated confirmation email

    In CraftForms terms, a booking lives in the Catalog. Go to CraftForms → Catalog in your WordPress admin (it sits under the CraftForms Forms Management menu), and you’ll either see your booking item there or create a new one with Type: Booking.

    Once you have a booking item that’s actually taking reservations, you’re ready to wire it to Google Calendar.


    Part 1 — The main event: see your bookings in Google Calendar

    This is the outbound direction: CraftForms → Google Calendar. Your bookings flow out to Google.

    Step 1: Grab your export feed URL from CraftForms

    1. Go to CraftForms → Catalog and open your booking item.
    2. Scroll to the section titled “iCal Import / Export.”
    3. Find the field labelled “Export — Feed URL for external platforms.” It shows a long read-only URL.
    4. Click Copy.

    That URL is your booking calendar. Keep it on your clipboard for the next step.

    If you see “Save this item first to generate the export URL” instead of a URL, just save the booking item once. The feed URL is generated the first time the item is saved, then it stays stable forever (so subscriptions never break).

    Cf ical export import

    Step 2: Add the feed to Google Calendar

    Now hand that URL to Google:

    1. Open Google Calendar on a desktop browser (the subscribe option isn’t available in the mobile app — but once added, it syncs to mobile automatically).
    2. In the left sidebar, find “Other calendars” and click the + next to it.
    3. Choose “From URL.”
    4. Paste your CraftForms export feed URL into the box.
    5. Click “Add calendar.”

    That’s it. Google fetches the feed and adds a new calendar to your list. Your CraftForms bookings now appear as events.

    Cf gcal add new cal

    Google’s menu labels shift from time to time. If “From URL” isn’t where you expect, look under Settings → Add calendar → From URL — same feature, longer path.

    Step 3: See it work

    Within a short while, your booked dates show up on the calendar as all-day “Booked” events sitting alongside everything else you already track.

    A few things to notice about how it looks:

    • Day-based bookings (hotel / B&B style) show as a block spanning the booked nights.
    • Single-date and time-slot bookings (appointments, drop-ins) show as the booked day.
    • The event is simply titled “Booked.” It deliberately contains no customer name, email, or any personal detail — see the privacy note below.

    A genuinely nice side effect: privacy

    The feed only ever says “Booked.” It never publishes who booked, their email, their phone number, or what they ordered.

    That’s by design, and it matters. Because the feed URL has to be publicly reachable for Google to fetch it (Google won’t log into your WordPress admin), you do not want it leaking customer data. CraftForms keeps the customer’s actual details safely in your WordPress database — where you can see them in the submissions and orders — and lets only the bare “this slot is taken” signal out to the calendar.

    So if you ever share that Google calendar with a part-timer or a cleaner, you’re showing them your availability, not your client list.

    The token is your lock. That random string at the end of the URL is the only thing protecting the feed. Treat it like a password: don’t post the full URL publicly. If it ever leaks, duplicating the booking item generates a fresh URL (the old one stops working).


    The honest part: how fresh is it, really?

    Here’s what most tutorials skip. Calendar subscriptions are not instant.

    When Google subscribes to an external ICS feed, Google decides how often to check it — and Google is famously unhurried about this. In practice a subscribed feed refreshes anywhere from a few hours to around a day. You cannot force Google to check more often; that schedule is on their side, not yours.

    What this means in practice:

    • For planning and visibility — perfect. Seeing this week’s and next week’s bookings on your phone? Works beautifully.
    • For minute-by-minute, real-time accuracy — not the tool. If you need a booking to appear in Google within seconds (say, to stop a same-hour double-booking across two systems), an ICS subscription is the wrong mechanism. That’s what a real-time channel manager is for, and it’s overkill for most small operators.

    To nudge along the very first sync, remove and re-add the calendar in Google — a fresh subscription fetches immediately. After that, let Google do its thing.

    Don’t mistake this for CraftForms being slow. Your site’s own booking calendar and date picker update the instant a booking is made — there’s no double-booking risk on your website. The delay is purely Google’s polling of the external feed.


    Part 2 (bonus) — Block your days off automatically

    The feed runs both directions, and the reverse is just as useful.

    Say you keep your personal commitments — holidays, that dentist appointment, the long weekend — in a Google Calendar. You’d like the website to know you’re unavailable on those days and stop offering them to customers. CraftForms can subscribe to your Google Calendar and block those dates in the date picker.

    This is the inbound direction: Google Calendar → CraftForms.

    1. In Google Calendar: open the settings for the calendar you want CraftForms to read. Under “Integrate calendar,” copy the “Secret address in iCal format.” (Use the secret address — it’s the private one only you should hold.)
    2. In CraftForms: open your booking item, go to the same “iCal Import / Export” section, and paste that address into the “Import — iCal Feed URL” field.
    3. Save.

    From now on, CraftForms pulls that Google Calendar every hour and marks any busy dates as unavailable in your booking date picker. Block out next week in Google, and customers can no longer book you for next week — no manual blocking required.

    Want to verify it immediately instead of waiting for the hourly sync? If you have command-line access, run wp cron event run craftforms_ical_sync to force a pull right away.

    You can point the Import field at any ICS feed — a partner’s calendar, a shared “shop closed” calendar, even another booking platform. CraftForms treats every busy date in that feed as a date to block.


    Putting it together: one calendar, every device

    With both directions wired up, you’ve built a tidy little loop:

    • Customers book on your site → those bookings flow out to your Google Calendar, so you (and your team) see them everywhere.
    • You block personal time in Google → those dates flow in to CraftForms, so customers can’t book over your life.

    All of it through one open, universal format, with no monthly connector fee and no customer data leaving your server.


    When an ICS feed isn’t the answer

    To be fair about the limits:

    • You need real-time, two-way sync across multiple sales channels. If you’re selling the same rooms on Airbnb, Booking.com, and your site simultaneously and a delay of even an hour risks a double-booking, you want a dedicated channel manager (Hostaway, Guesty, Lodgify) that uses each platform’s live API. ICS feeds, by their nature, poll on a schedule.
    • You want to edit bookings from Google. The export feed is read-only. Dragging the “Booked” event in Google won’t move the actual reservation in CraftForms — manage bookings from the CraftForms admin.

    For the overwhelming majority of small operators, though — the ones who just want their bookings to show up where they already look — the ICS feed is exactly enough, and it’s already in the box.


    CraftForms is a WordPress form and booking builder. The booking catalog and iCal import/export feeds described here are part of CraftForms Pro.

  • Complex WooCommerce Pricing Without Hundreds of Variations

    Complex WooCommerce Pricing Without Hundreds of Variations


    TL;DR

    • WooCommerce variations work for small, fixed sets (3 sizes × 2 colours = 6 rows). They fall apart when pricing is combinatorial (size × material × length) or continuous (any quantity, any dimension).
    • You end up entering — and maintaining — hundreds of rows by hand, and a customer who wants 137 units still can’t be priced, because variations can’t interpolate between your presets.
    • CraftForms replaces the grid with a price formula plus a price matrix (a lookup table). One rule prices every combination, including the ones you never typed in.
    • Two ready-made starter forms ship with it — WC: Pipe (formula pricing) and WC: Stickers (quantity × size tiers) — and you can edit the pricing table as a CSV in a spreadsheet.
    • The price updates live in the browser as the customer configures, and is recalculated on the server at submit, so the amount charged is always the server’s number.

    The features and starters in this guide are part of CraftForms Pro.


    The problem: variations don’t scale with complexity

    WooCommerce’s attribute-and-variation system is one of the best things about it — for the job it was designed to do. A T-shirt in three sizes and two colours is six variations. You set a price for each, attach an image, track stock, done. Clean.

    The trouble starts when your pricing has more than one or two dimensions, or when one of those dimensions is a number rather than a short list.

    Consider a sticker shop. You offer four sizes and let customers buy in tiers: 50, 100, 200, 300, 500, 1,000, 2,000, 3,000, 5,000, or 10,000 stickers. That’s already 4 × 10 = 40 variations for a single product — forty rows to create, price, and keep up to date. And it gets worse:

    • You can’t price the in-between. A customer wants 137 stickers. There’s no variation for 137. They either can’t order it, or you force them into a tier that doesn’t reflect what they’re buying.
    • Add a third dimension and it explodes. Offer two materials as well and you’re at 80 rows. A fourth finish option and you’re past 300. This is the “I have to manually add 640 price options for one product” situation people describe on the WooCommerce forums — and they’re not exaggerating.
    • Every price change is a chore. Raise prices 5% and you’re editing dozens of variation rows by hand, hoping you didn’t fat-finger one.

    The root issue is that variations store a finished answer for every possible question. If the questions are few and fixed, that’s fine. If they’re many, or open-ended, storing every answer is the wrong model. You want to store the rule instead.

    The fix: a formula and a lookup table

    CraftForms takes a different approach. Instead of attaching pricing to pre-built variations, you build the product as a small form on the product page and define how the price is calculated. There are three building blocks, all managed from the Smart Variables panel in the form editor:

    • Expression — a pricing formula written from the form’s field values, e.g. base * quantity or area * rate.
    • Price matrix — a lookup table keyed by one or two field values, with a choice of lookup strategies: Exact match, Closest up (largest ≤ value), or Closest (nearest).
    • Conditional variable — picks a value or another table depending on what the customer selected.

    The form’s final price comes from a Price Formula that ties these together. Let’s see it on the two real products that ship as starters.

    Tip: Both examples below are included as starter forms (one-click install) — WC: Pipe and WC: Stickers — so you can load one and inspect every formula rather than building from scratch.

    Walkthrough 1 — Pipe pricing from one formula (the “WC: Pipe” starter)

    A pipe’s price depends on three things: its diameter, its material, and its length in feet. Length is the giveaway that variations can’t handle this — length is continuous. Someone might order 2.3 feet, or 5.8.

    Here’s the entire pricing setup:

    1. Diameter is a dropdown. A price matrix maps each diameter to a base price — 3″ → 45.50, 4″ → 77.05, 5″ → 108.60, and so on. The result is a Smart Variable, diameter_price.
    2. Material is a set of radio buttons that resolves to a multiplier, material_coef — for example galvanised steel at ×1.0 and 304 stainless at ×1.7.
    3. Length is a number input the customer types directly (with a min, max, and step).

    The Price Formula is just:

    diameter_price * material_coef * length
    

    That single line prices every combination of diameter, material, and length — including the 2.3-foot order that no variation table would ever contain. There is nothing to maintain combinatorially: change a diameter’s base price in one table cell, or a material’s multiplier, and every order reprices instantly.

    As WooCommerce variations, this product is impossible to model properly. As a CraftForms form, it’s one table, one multiplier, and one line of arithmetic.

    Walkthrough 2 — Quantity-tier pricing done right (the “WC: Stickers” starter)

    This is the example that maps directly onto the “40-to-640 variations” pain, so it’s worth seeing in full.

    Cf stickers product starter

    The sticker product has two inputs: size (50×50, 75×75, 100×100, 125×125 mm) and quantity (the ten tiers above, plus a “Custom qty” option). Here’s how the pricing is built without a single variation:

    1. A unit-price matrix per size. Each size has a price matrix keyed on quantity, using the Closest up (largest ≤ value) strategy. For the 50×50 sticker, the unit price steps down as volume rises: 1.08 at 50 pieces, 0.65 at 100, 0.425 at 200, all the way down to 0.108 at 10,000.
    2. The “Closest up” strategy is what makes custom quantities work. Because the lookup picks the largest tier at or below the entered number, a customer who types 137 automatically lands on the 100-piece unit price — the correct tier — with no variation for 137 anywhere in sight. This is precisely the thing variations cannot do.
    3. A conditional variable picks the right table. unit_price_for_size selects the 50×50, 75×75, 100×100, or 125×125 matrix based on the chosen size.
    4. The final price is one expression: unit_price_for_size * quantity.

    That’s the whole engine. But the starter goes further to show what becomes easy once pricing is rule-based rather than row-based:

    • Live per-tier prices on the buttons. Each quantity option shows its total price and the volume discount versus the 50-piece rate — e.g. “1,000 · Discount 62%”. Those discounts are computed by Smart Variables, not typed in.
    • A running total in an Info block that updates the instant the customer changes size or quantity.
    • A custom-quantity branch. Choosing “Custom qty” reveals a number field (min 10, step 10) via conditional logic, and the total — plus a “you save X%” message — recalculates for whatever they enter.
    • An Add to Cart button that drops the configured sticker, at its calculated price, straight into the WooCommerce cart.

    To build the equivalent in stock WooCommerce you’d need 40 variations just for the fixed tiers, custom quantities would be impossible, and the per-tier discount labels wouldn’t exist at all.

    Editing prices stays sane: CSV import and export

    A fair objection: “Isn’t a big lookup table just as annoying to edit as a big variations list?”

    No — because the table isn’t a wall of WordPress UI rows. Every price matrix has Import CSV and Export CSV buttons. Export the table, open it in Excel or Google Sheets, edit prices the way you’d edit any spreadsheet, and re-import. Updating an entire price list becomes one paste instead of dozens of individual row edits.

    It also solves onboarding: if you already keep your pricing in a spreadsheet — and most businesses with this kind of pricing do — you can bring it straight in rather than retyping it into variation rows.

    It stays honest: server-side recalculation

    Live, in-browser pricing raises an obvious security question: if the price is calculated in JavaScript, can a customer tamper with it?

    They can’t change what they’re charged. The number shown as they configure is calculated in the browser for responsiveness, but when the form is submitted, CraftForms re-evaluates the formula on the server and uses that result for the cart and the order. Whatever the browser displayed, the server has the final say. Client-side price manipulation doesn’t reach checkout.

    When WooCommerce variations are still the right tool

    This isn’t an argument against variations — it’s about using each tool for the job it fits.

    Stick with native variations when:

    • You have a small, fixed set of combinations.
    • Each combination genuinely needs its own SKU, its own product image, and its own independently managed stock.

    Reach for a CraftForms formula when:

    • Pricing is formula-driven (per-unit, per-area, base + modifiers).
    • Pricing is tiered (volume discounts, quantity breaks).
    • A dimension is continuous (length, area, weight, custom quantity).
    • The variation count is heading into the dozens or hundreds.

    And if your worry about leaving variations is stock control, that’s covered too: CraftForms can track inventory per option-combination using a Dynamic SKU and a custom stock table — so you don’t have to choose between flexible pricing and real inventory.

    Getting started

    1. Install CraftForms Pro and enable the WooCommerce integration.
    2. Create a new form and load the WC: Stickers (or WC: Pipe) starter to see a complete, working setup.
    3. Open the Smart Variables panel to inspect the price matrices and the Price Formula.
    4. Swap in your own prices — by hand, or via Export CSV / Import CSV (available for smart variables type “table”).
    5. Connect the form to your WooCommerce product and let customers configure, price, and add to cart in one step.

    You’ll have replaced a sprawling variations grid — and everything it couldn’t do — with a handful of rules that price every combination, including the ones you never typed in.

  • How to Create an Online Order Form for Your Small Business (2026)

    How to Create an Online Order Form for Your Small Business (2026)

    If you’re still taking orders by phone, email, or a basic “contact us” form, you’re doing extra work every single time someone wants to buy from you. You have to reply, confirm details, quote a price, wait, chase payment — and none of it is recorded anywhere unless you write it down yourself.

    A proper online order form handles all of that automatically: it shows customers what they’re paying before they submit, collects card payment at the same time, and drops every order into your WordPress admin so nothing slips through. This guide walks you through building one from scratch using CraftForms — no WooCommerce, no page builder, no coding required.


    Why a Contact Form Isn’t Enough for Taking Orders

    A standard contact form sends you an email. That’s it. It has no concept of what the customer wants to buy, what it costs, or whether they’ve paid. Every submission kicks off a manual thread: you email back with a price, they reply to confirm, you send a payment link, they pay (maybe), you note it in a spreadsheet.

    That process works for three customers. It breaks at thirty.

    What a proper order form does differently:

    • Shows a live price as the customer configures their order, so they know what they’re committing to before they hit submit
    • Collects payment in the same step — no chasing invoices
    • Saves every order to your WordPress admin with the customer’s details, choices, and payment status
    • Sends a confirmation email automatically, so the customer has a record and you don’t have to reply manually

    The form you build in this guide does all four.


    What You’ll Need

    • WordPress with CraftForms installed (the free version covers the form builder; the Pro version adds pricing, payment, and order management)
    • A Stripe account — free to create at stripe.com; Stripe takes a small per-transaction fee but there’s no monthly cost
    • About 20–30 minutes for a simple form; longer if you have complex pricing
    Small business form
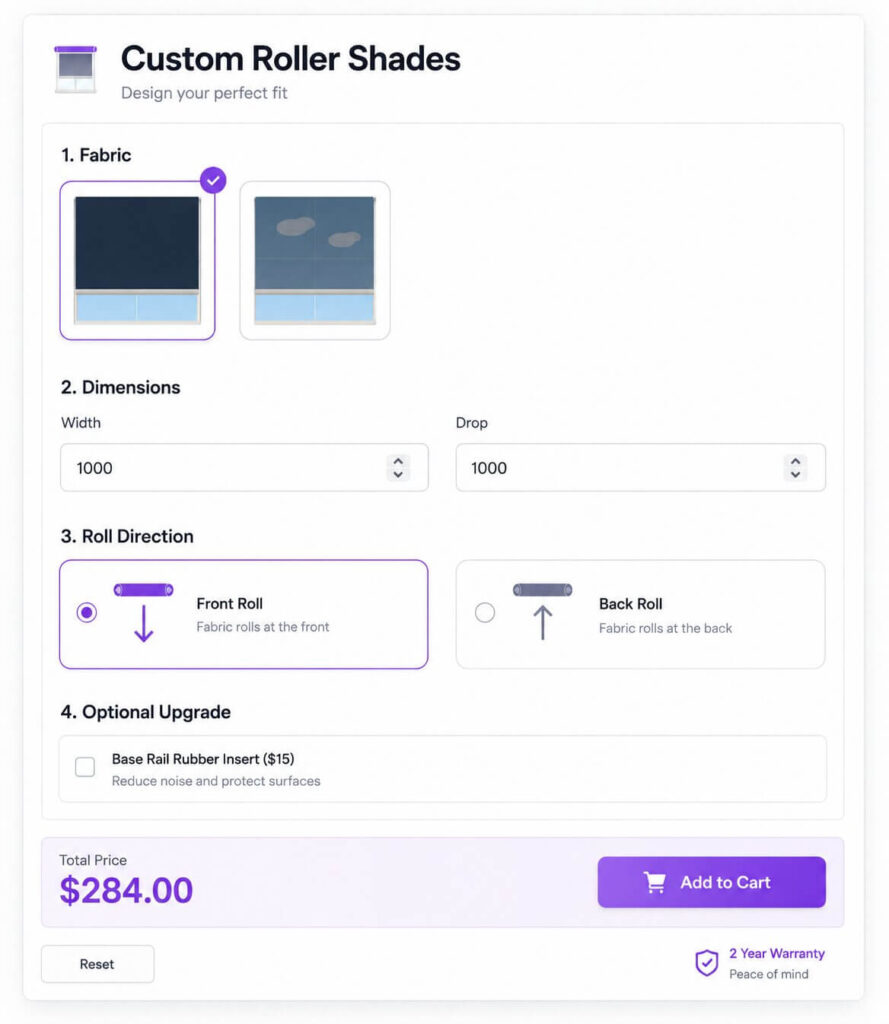
    Example of nice form for business

    Step 1 — Build the Order Form

    Go to CraftForms → Forms in your WordPress admin and click Add New. Give the form a name (you’ll see it in the forms list later) and you’ll land in the block editor with an empty form canvas.

    Adding the right fields

    A typical product order form needs:

    Customer details Add a Text Input Field for the customer’s name, another for their email address (set the input type to “Email” in the block settings), and optionally a phone number field.

    What they’re ordering This is where order forms differ from contact forms. Instead of a plain text box, use structured fields:

    • Select Field for a straightforward product list (a dropdown the customer picks from)
    • Radio Field if you want the options laid out as clickable cards — especially useful when you have 3–6 distinct products or service tiers

    For either field, you can attach a price to each option. When you edit the options list in the block sidebar, each option has a label, a value, and a price field. The price you enter here flows into your pricing formula later.

    Quantity Add a Text Input Field and set the input type to “Number”. Give it the field name quantity — you’ll reference this in the pricing formula.

    Notes or special instructions A Textarea Field covers any free-text requirements: dimensions, delivery notes, custom messages, etc.

    File upload (optional) If your customers need to send artwork, a logo, or technical drawings, add a File Upload Field. You can restrict it to specific file types (PDF, PNG, AI, etc.) in the block settings.

    Using swatches for product variants

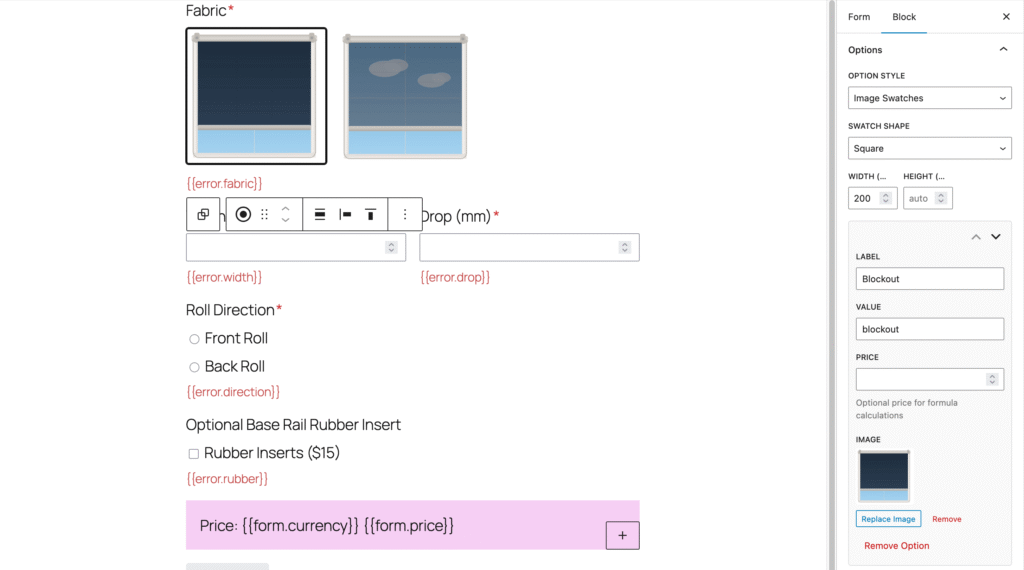
    If your product comes in colours or materials, plain dropdown text doesn’t do it justice. Radio Fields and Checkboxes Fields both support image swatches and colour swatches — switch the display mode in the block sidebar under “Option Style”.

    With image swatches, each option shows a small thumbnail. With colour swatches, each option shows a filled circle or square. Either way, the customer clicks a swatch to select it, which feels much more like shopping than filling in a form.

    Editor swatches
    Example of Roller Blinds product form

    Step 2 — Add a Live Price Calculation

    This is what separates a configurator from a contact form. CraftForms calculates the order total from your field values and shows it live on the form as the customer makes selections.

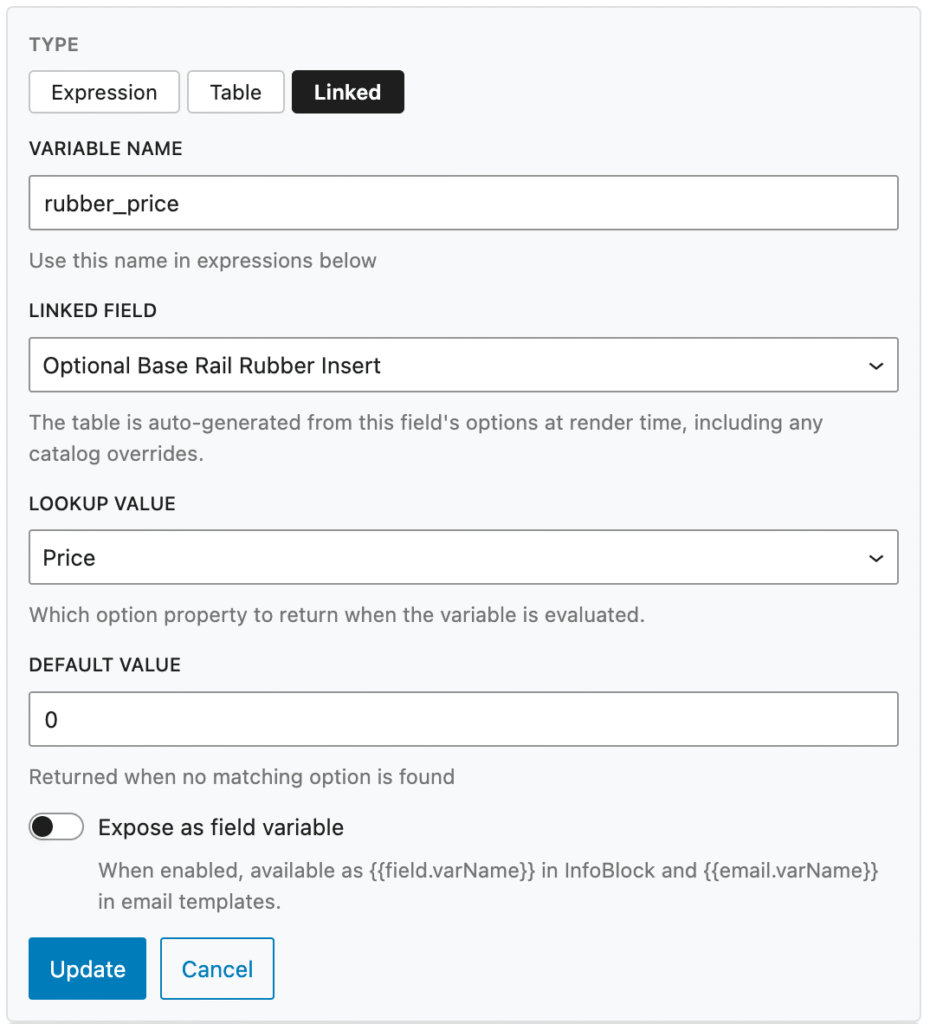
    Bridging option prices into your formula with Linked variables

    Smart variable rubber
    Example of Rubber option pricing setup

    In Step 1 you attached a price to each option in your Radio or Select field. To use those prices in a formula, you first need to surface them as a Smart Variable.

    Open the Smart Variables panel and click Manage Smart Variables. Create a new variable, set the type to Linked, and point it at your product field with the lookup set to price. Give the variable a name — say, product_price. CraftForms will now automatically hold the price of whichever option the customer selects in that variable.

    Writing a pricing formula

    In the form editor, look for the Pricing panel in the right-hand sidebar (you may need to click into the form root block to see it). Enter either a fixed number (e.g. 29.99) or a formula that references your field names and Smart Variable names.

    With the Linked variable in place, a simple quantity × unit price formula looks like this:

    quantity * product_price
    

    Where quantity is the name of your number field and product_price is the Linked Smart Variable you created above.

    The server recalculates this formula when the form is submitted — meaning customers cannot tamper with the price in the browser. What they see is always what gets charged.

    More complex pricing with Expression variables

    For anything beyond a single multiplication — tiered pricing, add-on fees, bundle discounts — create an Expression variable in Smart Variables (custom formulas with access to functions like round(), min(), max(), and ceil()). If you have a “rush” field whose selected option carries a price, create a second Linked variable rush_fee for it the same way, then combine them:

    round((quantity * product_price) + rush_fee, 2)
    

    For pricing that depends on two dimensions — such as width and height, or distance and weight — use a Table variable. You define rows and columns, populate the cells with prices, and CraftForms does the lookup automatically. You can type the values in manually or import them from a CSV if you already have a price sheet.

    If your business sells custom-sized products where the price changes based on dimensions, the Table variable is the right tool. For a detailed real-world walkthrough, see the roller blinds product configurator tutorial — it builds a complete two-variable pricing setup from scratch.

    Displaying the price on the form

    Once your formula is set, add an InfoBlock anywhere in the form (it’s a standard block you can insert from the block inserter). Inside the InfoBlock, type something like:

    Your total: {{form.price}} {{form.currency}}
    

    The {{form.price}} tag is replaced with the calculated total, and {{form.currency}} shows the currency symbol. The InfoBlock updates in real time as the customer fills in or changes any field — no page reload required.


    Step 3 — Connect Stripe and Take Payment

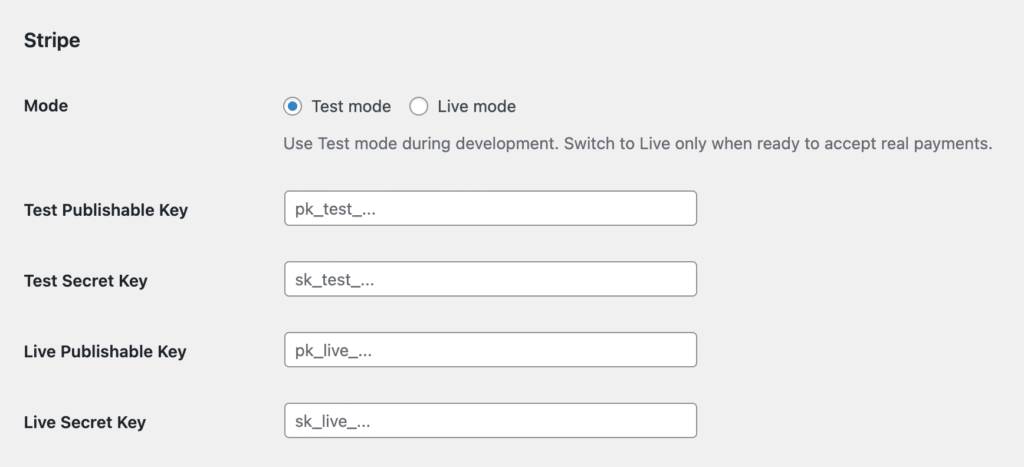
    Go to CraftForms → Payment Settings in your WordPress admin. This is where you wire up Stripe.

    Connecting your Stripe account

    You’ll need two keys from your Stripe dashboard — the Publishable Key (starts with pk_) and the Secret Key (starts with sk_). Stripe provides both test and live versions; paste the test keys first so you can run through a payment without charging anyone.

    In Payment Settings, set the mode to “Test”, enter your test publishable and secret keys, and save. While you’re there, set your currency (18 options available, including USD, EUR, GBP, and CAD) and fill in the success URL — the page you want customers to land on after a successful payment.

    You’ll also need to configure a webhook in your Stripe dashboard. CraftForms shows you the exact webhook URL to use (it looks like yoursite.com/wp-json/craftforms/v1/stripe/webhook). The webhook tells CraftForms when a payment has been confirmed, which is what updates the order status from “pending” to “paid”.

    Enabling payment on the form

    Back in the form editor, add the CraftForms Payment block to your form from the block inserter — place it near the bottom, just before the submit button. Adding this block is what activates the payment flow for the form; without it, the form submits as normal without charging anyone.

    Going live

    When you’re ready to accept real payments, return to CraftForms → Payment Settings, switch the mode to “Live”, and replace the test keys with your live keys. Everything else stays the same.

    Payment settings
    CraftForms pricing settings

    Step 4 — Set Up a Confirmation Email

    After a successful order, the customer should receive an email summarising what they ordered and what they paid. Go to the form’s action settings and add an email action — set the recipient to {{email}} (or whatever you named your email field) and write the body.

    You can reference any field value with {{field_name}} and include the order total with {{email.price}}. For a branded email with a header image, logo, and styled layout, create an Email Template under CraftForms → Email Templates and select it in the email action.


    Managing Orders in the WordPress Admin

    Every paid order appears in CraftForms → Orders. The orders list shows the customer name, form, order total, payment status, and submission date. Clicking an order opens the full detail: every field value the customer submitted, the Stripe payment reference, and the current order status.

    Order statuses follow a simple flow: pending → confirmed → paid → refunded. You can update the status manually if needed (for example, marking a cash order as confirmed), or statuses update automatically via the Stripe webhook.


    What Else Can You Build With This?

    An order form is one pattern. If your business sells time — hotel nights, rental periods, event slots, or appointments — you need availability management on top of what’s covered here: a date picker that blocks out already-booked dates and prevents double bookings. That’s a different setup, and we’ve written a complete guide for it: How to Build a B&B Booking Form with Availability and Orders.


    Summary

    Here’s what you’ve built:

    1. A structured order form with the right field types for your product or service
    2. A live price calculation that updates as the customer configures their order — using a simple formula or a Smart Variables Table for more complex pricing
    3. A Stripe payment step that charges the customer at the same time they submit
    4. Automatic confirmation emails with the order details
    5. An order list in your WordPress admin where you can track every order and its payment status

    The whole thing runs inside WordPress, no third-party platform required, and you keep 100% of the order data.