If you’re still taking orders by phone, email, or a basic “contact us” form, you’re doing extra work every single time someone wants to buy from you. You have to reply, confirm details, quote a price, wait, chase payment — and none of it is recorded anywhere unless you write it down yourself.
A proper online order form handles all of that automatically: it shows customers what they’re paying before they submit, collects card payment at the same time, and drops every order into your WordPress admin so nothing slips through. This guide walks you through building one from scratch using CraftForms — no WooCommerce, no page builder, no coding required.
Why a Contact Form Isn’t Enough for Taking Orders
A standard contact form sends you an email. That’s it. It has no concept of what the customer wants to buy, what it costs, or whether they’ve paid. Every submission kicks off a manual thread: you email back with a price, they reply to confirm, you send a payment link, they pay (maybe), you note it in a spreadsheet.
That process works for three customers. It breaks at thirty.
What a proper order form does differently:
- Shows a live price as the customer configures their order, so they know what they’re committing to before they hit submit
- Collects payment in the same step — no chasing invoices
- Saves every order to your WordPress admin with the customer’s details, choices, and payment status
- Sends a confirmation email automatically, so the customer has a record and you don’t have to reply manually
The form you build in this guide does all four.
What You’ll Need
- WordPress with CraftForms installed (the free version covers the form builder; the Pro version adds pricing, payment, and order management)
- A Stripe account — free to create at stripe.com; Stripe takes a small per-transaction fee but there’s no monthly cost
- About 20–30 minutes for a simple form; longer if you have complex pricing
Step 1 — Build the Order Form
Go to CraftForms → Forms in your WordPress admin and click Add New. Give the form a name (you’ll see it in the forms list later) and you’ll land in the block editor with an empty form canvas.
Adding the right fields
A typical product order form needs:
Customer details Add a Text Input Field for the customer’s name, another for their email address (set the input type to “Email” in the block settings), and optionally a phone number field.
What they’re ordering This is where order forms differ from contact forms. Instead of a plain text box, use structured fields:
- Select Field for a straightforward product list (a dropdown the customer picks from)
- Radio Field if you want the options laid out as clickable cards — especially useful when you have 3–6 distinct products or service tiers
For either field, you can attach a price to each option. When you edit the options list in the block sidebar, each option has a label, a value, and a price field. The price you enter here flows into your pricing formula later.
Quantity
Add a Text Input Field and set the input type to “Number”. Give it the field name quantity — you’ll reference this in the pricing formula.
Notes or special instructions A Textarea Field covers any free-text requirements: dimensions, delivery notes, custom messages, etc.
File upload (optional) If your customers need to send artwork, a logo, or technical drawings, add a File Upload Field. You can restrict it to specific file types (PDF, PNG, AI, etc.) in the block settings.
Using swatches for product variants
If your product comes in colours or materials, plain dropdown text doesn’t do it justice. Radio Fields and Checkboxes Fields both support image swatches and colour swatches — switch the display mode in the block sidebar under “Option Style”.
With image swatches, each option shows a small thumbnail. With colour swatches, each option shows a filled circle or square. Either way, the customer clicks a swatch to select it, which feels much more like shopping than filling in a form.

Step 2 — Add a Live Price Calculation
This is what separates a configurator from a contact form. CraftForms calculates the order total from your field values and shows it live on the form as the customer makes selections.
Bridging option prices into your formula with Linked variables
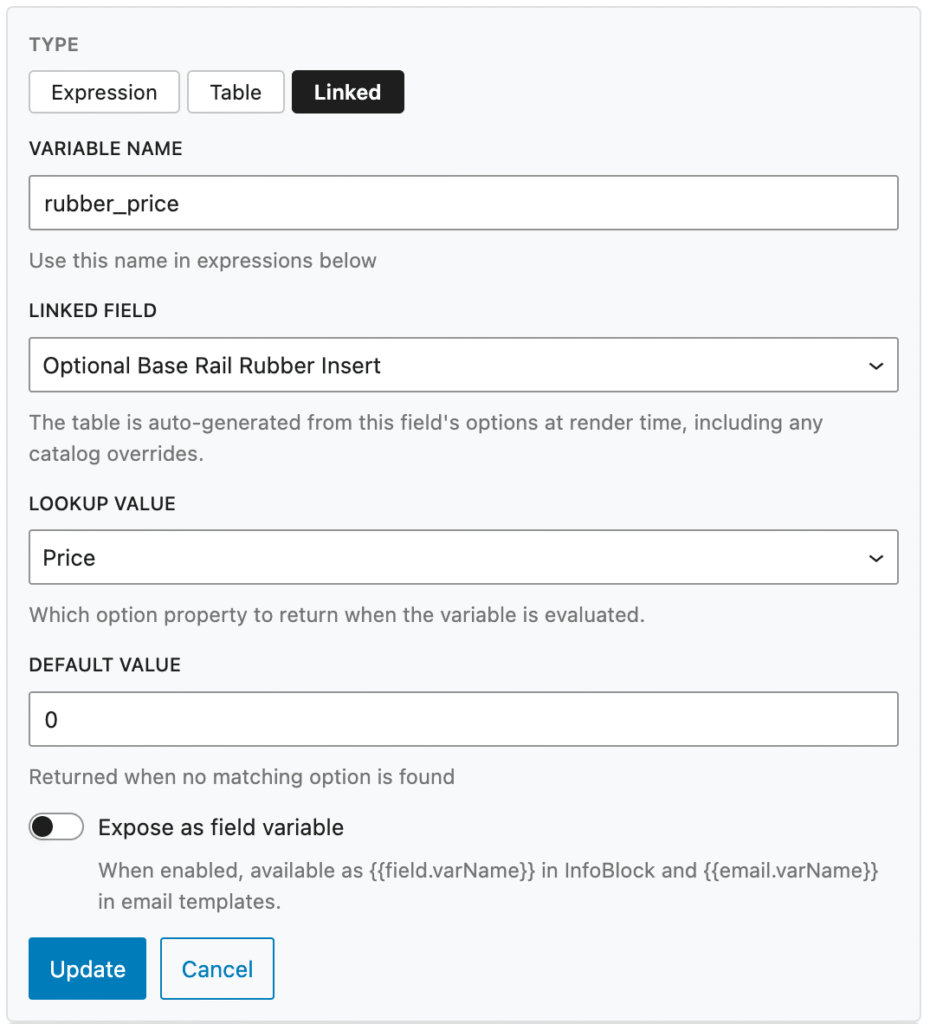
In Step 1 you attached a price to each option in your Radio or Select field. To use those prices in a formula, you first need to surface them as a Smart Variable.
Open the Smart Variables panel and click Manage Smart Variables. Create a new variable, set the type to Linked, and point it at your product field with the lookup set to price. Give the variable a name — say, product_price. CraftForms will now automatically hold the price of whichever option the customer selects in that variable.
Writing a pricing formula
In the form editor, look for the Pricing panel in the right-hand sidebar (you may need to click into the form root block to see it). Enter either a fixed number (e.g. 29.99) or a formula that references your field names and Smart Variable names.
With the Linked variable in place, a simple quantity × unit price formula looks like this:
quantity * product_price
Where quantity is the name of your number field and product_price is the Linked Smart Variable you created above.
The server recalculates this formula when the form is submitted — meaning customers cannot tamper with the price in the browser. What they see is always what gets charged.
More complex pricing with Expression variables
For anything beyond a single multiplication — tiered pricing, add-on fees, bundle discounts — create an Expression variable in Smart Variables (custom formulas with access to functions like round(), min(), max(), and ceil()). If you have a “rush” field whose selected option carries a price, create a second Linked variable rush_fee for it the same way, then combine them:
round((quantity * product_price) + rush_fee, 2)
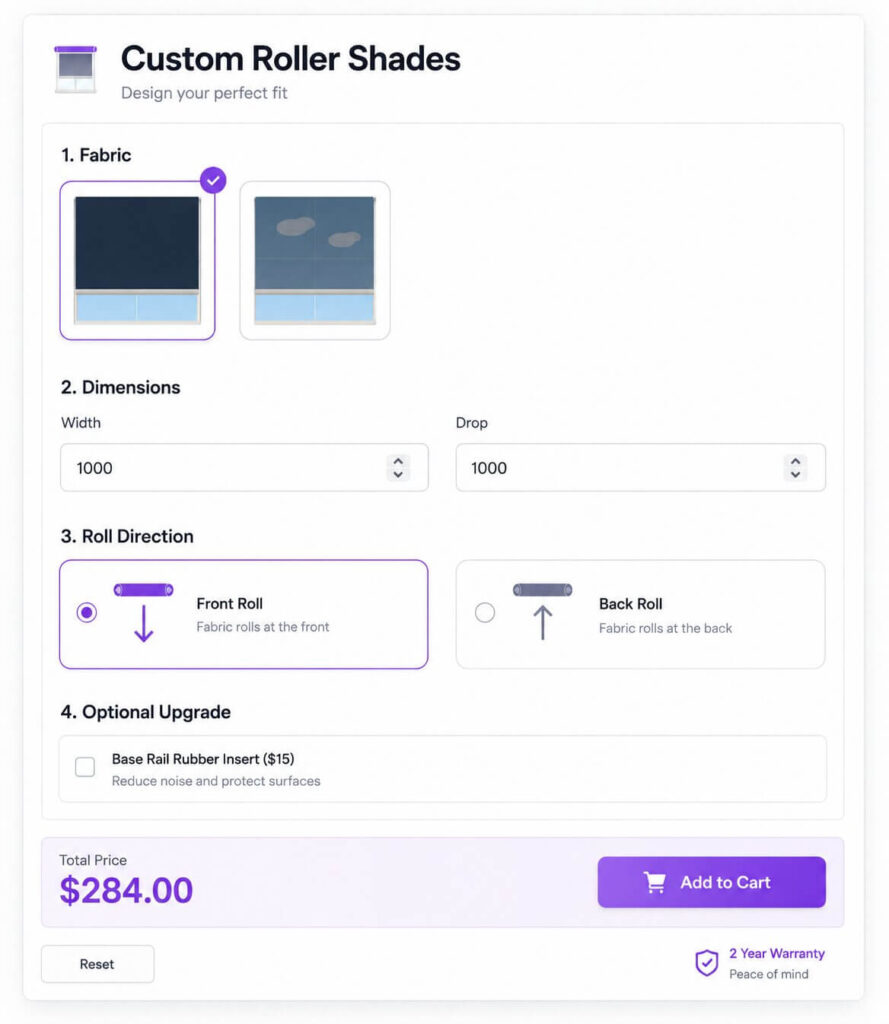
For pricing that depends on two dimensions — such as width and height, or distance and weight — use a Table variable. You define rows and columns, populate the cells with prices, and CraftForms does the lookup automatically. You can type the values in manually or import them from a CSV if you already have a price sheet.
If your business sells custom-sized products where the price changes based on dimensions, the Table variable is the right tool. For a detailed real-world walkthrough, see the roller blinds product configurator tutorial — it builds a complete two-variable pricing setup from scratch.
Displaying the price on the form
Once your formula is set, add an InfoBlock anywhere in the form (it’s a standard block you can insert from the block inserter). Inside the InfoBlock, type something like:
Your total: {{form.price}} {{form.currency}}
The {{form.price}} tag is replaced with the calculated total, and {{form.currency}} shows the currency symbol. The InfoBlock updates in real time as the customer fills in or changes any field — no page reload required.
Step 3 — Connect Stripe and Take Payment
Go to CraftForms → Payment Settings in your WordPress admin. This is where you wire up Stripe.
Connecting your Stripe account
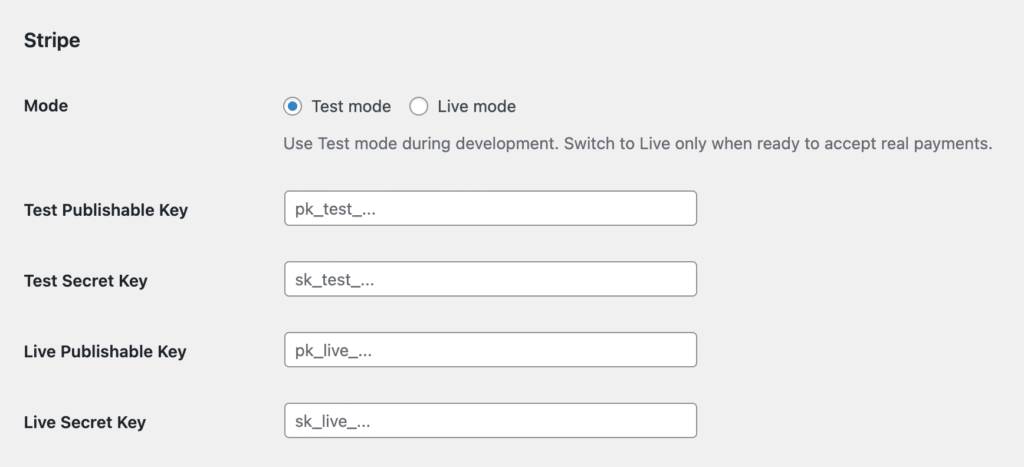
You’ll need two keys from your Stripe dashboard — the Publishable Key (starts with pk_) and the Secret Key (starts with sk_). Stripe provides both test and live versions; paste the test keys first so you can run through a payment without charging anyone.
In Payment Settings, set the mode to “Test”, enter your test publishable and secret keys, and save. While you’re there, set your currency (18 options available, including USD, EUR, GBP, and CAD) and fill in the success URL — the page you want customers to land on after a successful payment.
You’ll also need to configure a webhook in your Stripe dashboard. CraftForms shows you the exact webhook URL to use (it looks like yoursite.com/wp-json/craftforms/v1/stripe/webhook). The webhook tells CraftForms when a payment has been confirmed, which is what updates the order status from “pending” to “paid”.
Enabling payment on the form
Back in the form editor, add the CraftForms Payment block to your form from the block inserter — place it near the bottom, just before the submit button. Adding this block is what activates the payment flow for the form; without it, the form submits as normal without charging anyone.
Going live
When you’re ready to accept real payments, return to CraftForms → Payment Settings, switch the mode to “Live”, and replace the test keys with your live keys. Everything else stays the same.
Step 4 — Set Up a Confirmation Email
After a successful order, the customer should receive an email summarising what they ordered and what they paid. Go to the form’s action settings and add an email action — set the recipient to {{email}} (or whatever you named your email field) and write the body.
You can reference any field value with {{field_name}} and include the order total with {{email.price}}. For a branded email with a header image, logo, and styled layout, create an Email Template under CraftForms → Email Templates and select it in the email action.
Managing Orders in the WordPress Admin
Every paid order appears in CraftForms → Orders. The orders list shows the customer name, form, order total, payment status, and submission date. Clicking an order opens the full detail: every field value the customer submitted, the Stripe payment reference, and the current order status.
Order statuses follow a simple flow: pending → confirmed → paid → refunded. You can update the status manually if needed (for example, marking a cash order as confirmed), or statuses update automatically via the Stripe webhook.
What Else Can You Build With This?
An order form is one pattern. If your business sells time — hotel nights, rental periods, event slots, or appointments — you need availability management on top of what’s covered here: a date picker that blocks out already-booked dates and prevents double bookings. That’s a different setup, and we’ve written a complete guide for it: How to Build a B&B Booking Form with Availability and Orders.
Summary
Here’s what you’ve built:
- A structured order form with the right field types for your product or service
- A live price calculation that updates as the customer configures their order — using a simple formula or a Smart Variables Table for more complex pricing
- A Stripe payment step that charges the customer at the same time they submit
- Automatic confirmation emails with the order details
- An order list in your WordPress admin where you can track every order and its payment status
The whole thing runs inside WordPress, no third-party platform required, and you keep 100% of the order data.